14
SERVICE (cont.)
AUGER DRIVE COMPONENTS (cont.)
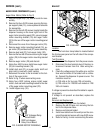
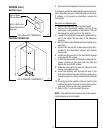
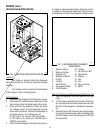
Auger Drive Motor (Refer to Fig. 2)
1. Remove hopper assy (18), and set aside for reas-
sembly.
2. Remove the four #8-32 screws securing the hop-
per support plate (13), remove plate and set aside
for reassembly.
3. Remove the four #8-32 screws, located inside the
dispener housing on the lower right front of the
auger motor mounting panel (22), securing auger
motor mounting bracket (19) and auger motor
(20) to the rear of the auger motor mounting panel
(22).
4. Disconnect the wires from the auger motor (20).
5. Remove auger motor mounting bracket (19), au-
ger motor (20) and dust seal (21) as an assembly.
6. Remove dust seal (21) from auger motor (20).
7. Remove the four #8-32 screws securing the auger
motor (20) to the auger motor mounting bracket
(19).
8. Remove auger motor (20) and discard.
9. Using four #8-32 screws install new auger motor
(20) on mounting bracket (19).
10. Install dust seal (21) on auger motor shaft and
align notch in seal with motor casting.
11. Reconnect the wires to the terminals on the bot-
tom of the auger motor.
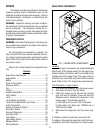
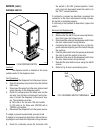
12. Refer to Fig. 3 when reconnecting wires.
13. Using four #8-32 locking screws install auger
motor, dust seal and mounting bracket to the rear
of the auger motor mounting panel (22).
14. Install hopper assy (18).
GRY to Hopper Delay
Circuit Board
RED from Hopper
Delay Circuit Board
P1201
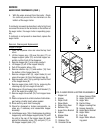
BALLAST
Location
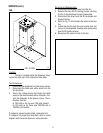
The front door lamp ballast is located behind
the front access panel on the left side of the compo-
nent bracket
Test Procedure
1. Disconnect the dispenser from the power source.
2. Disconnect the two terminal plug of the door in-
terconnect harness from the main wiring har-
ness.
3. Check the voltage across the white wire and the
blue wire terminals of the ballast with a voltme-
ter. Connect the dispenser to power source. The
indication must be:
a) 120 volts ac for two wire 120 volt models.
b) 120 volts ac for 120/208 volt models or 120/
240 volt models.
If voltage is present as described the ballast is operat-
ing properly.
If voltage is not present as described, replace the
ballast.
Removal and Replacement
1. Disconnect the wires from the ballast.
2. Remove the #8-32 keps nuts securing the bal-
last to the dispenser base.
3. Remove and discard ballast.
4. Install new ballast over the weld pin on the com-
ponent bracket and secure with one #8-32 screw.
5. Refer to the Fig. 5 when reconnecting the wires.
P1505
FIG. 3 AUGER MOTOR TERMINALS
FIG. 4 BALLAST


