


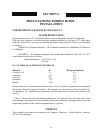

TOOLS FOR INSTALLATION
Drop cloth
3/32" Metal drill bit
5/16" Magnetic socket chuck adapter, 5/16" wrench (box or socket) or adjustable wrench
Jigsaw with masonry, metal and wood blades.
WARNING: DO NOT INSTALL IN A SLEEPING ROOM.
PREPARING THE HEATER FOR INSTALLATION
1. Inspect the unit for any obvious physical damage.
NOTE: Plug the power cord into a 115V AC outlet. Set switch to “Manual” and rheostat
to “High” position to ensure motor operates properly. Route the cord to prevent damage to
The cord insulation from heat and sharp objects. Keep the cord out of the way of traffic to
prevent damage caused by tripping, etc.
2. Check the primary air draft control to ensure it operates freely.
3. Remove any items from within the firebox. Spread the drop cloth on the floor behind the
heater. Next, tilt the heater so that the back is on the drop cloth.
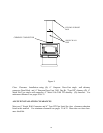
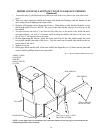
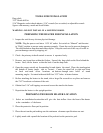
4. Open the proper outside air freestanding kit and obtain the stand. Place the stand against
the bottom of heater (angle side to heater). Center the stand left to right and front
to back and mark screw locations on bottom through outer holes of stand
mounting angles. Set stand aside and drill four 3/32" holes in heater bottom.
5. Before attaching the heater to the stand, take a large flat screwdriver or pliers and remove
the 2"x2" knockout on bottom of the unit.
6. Obtain four 3/16" self-tapping screws and secure the stand to the heater.
7. Reposition the heater to the upright position.
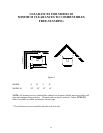
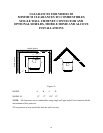
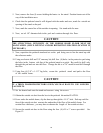
PREPARING THE ROOM HEATER LOCATION
1. Select an installation location that will give the best airflow from the front of the heater
to the remainder of the home.
2. Place the protective floor pad in position.
3. Place the unit on the pad making sure the minimum clearance specifications are met.
4. Lightly mark with a pencil the location of the pedestal on the protective pad.
25