1. Enter configuration mode if not already there. See above.
Use up and down buttons to make small (now flashing)
display indicate 03.
2. Press SET TIME/TEMP button once to flash current
selection of F or C. Factory default is F.
3. Use up and down buttons to move between F and C on large
display.
4. Press SET TIME/TEMP button again to flash upper small
display for selection of another option, or press END to exit
configuration mode.
OPTION 4—ENABLE FAN (G) ON WITH ANY HEAT (W)
This selection determines whether the G (fan) output is to be on or
off when any W (furnace or strip heat) output is ON. Most fan coils
manage their own blowers and do not require a separate G signal.
For these applications, select OF (off). Some auxiliary heaters
require a separate G signal to turn on the blower. In this case,
select ON. Factory default is OF.
TO SELECT:
1. Enter configuration mode if not already there. See above.
Use up and down buttons to make small (now flashing)
display indicate 04.
2. Press SET TIME/TEMP button once to flash the currect
selection of OF or ON. Factory default is OF.
3. Use up and down buttons to move between OF and ON on
large display.
4. Press SET TIME/TEMP button again to flash upper small
display for selection of another option, or press END to exit
configuration mode.
OPTION 8—AUXILIARY HEAT LOCKOUT TEMPERATURE
Present in heat pump and 2-speed models only when configured as
a heat pump. Outdoor temperature sensor must be attached. This
option allows selection of an outdoor temperature of 5 through
55°F in 5° steps (or equivalent values in C), or OF (off). Auxiliary
heat is prevented from operating for outdoor temperatures above
the selected temperature. If OF (off) is selected, auxiliary heat is
allowed at all outdoor temperatures. If selected, emergency heat
(EHEAT) overrides this feature. Factory default is OF.
TO SELECT:
1. Enter configuration mode if not already there. See above.
Use up and down buttons to make small (now flashing)
display indicate 08.
2. Press SET TIME/TEMP button once to flash large display.
3. Use up or down buttons to move between OF, 5, 10, 15, 20,
25, 30, 35, 40, 45, 50, or 55 on large display. Factory
default is OF.
4. Press SET TIME/TEMP button again to flash upper small
display for selection of another option, or press END to exit
configuration mode.
OPTION 13—ROOM TEMPERATURE OFFSET ADJUST
This option allows calibration (or deliberate miscalibration) of
room temperature sensor. There are various reasons why home-
owners may want to have displayed temperature adjusted to a
higher or lower value. The selected number is number of degrees,
plus or minus, which will be added to actual temperature. The
numbers can range between -5 and +5. Factory default is 0. This
adjusted value will be used as actual temperature for both display
and control action. For example, if 2 is selected, 72°F actual will
read 74°F. If set point is 72°F, the room will control to an actual
temperature of 70°F which will be displayed and acted upon as if
it were 72°F. The effect is that a positive number selection will
make the room temperature lower and vice versa. The thermostat
is calibrated within an accuracy of plus or minus 1° when shipped
from the factory, so this adjustment will provide the best accuracy
when set to 0.
TO SELECT:
1. Enter configuration mode if not already there. See above.
Use up and down buttons to make small (now flashing)
display indicate 13.
2. Press SET TIME/TEMP button once to flash large display.
3. Use up or down buttons to move between -5, -4, -3, -2, -1,
0, 1, 2, 3, 4, or 5 on large display. Factory default is 0.
4. Press SET TIME/TEMP button again to flash upper small
display for selection of another option, or press END to exit
configuration mode.
OPTION 15—ENABLE AUTO MODE
This option allows the installer to enable or disable AUTO mode
(automatic changeover between heat and cool). When disabled,
AUTO icon does not appear when successive presses of MODE
button are used to move between OFF, HEAT, COOL, and
EHEAT (in heat pump systems). Factory default is ON (AUTO
enabled).
TO SELECT:
1. Enter configuration mode if not already there. See above.
Use up and down buttons to make small (now flashing)
display indicate 15.
2. Press SET TIME/TEMP button once to flash large display.
3. Use up and down buttons to move between OF and ON on
large display. Factory default is ON (AUTO enabled).
4. Press SET TIME/TEMP button again to flash upper small
display for selection of another option, or press END to exit
configuration mode.
V. CHECK THERMOSTAT OPERATION
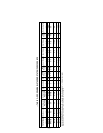
Before doing the checkout, press HOLD button to turn on HOLD
icon, locking thermostat in hold mode. This will assure set points
don’t change during the checkout. Outputs for each stage of
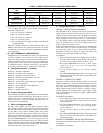
operation are listed in Table 2. In the table, the actual use of each
terminal is underlined for terminals having double use.
TO TEST THE FAN:
1. Press FAN button. The fan ON icon and the G output will
go on within a few seconds, causing fan to operate.
2. Pressing FAN button again will turn off the G output and
turn off fan AUTO icon.
TO TEST COOLING:
Press MODE button until COOL icon under it turns on. Press
down button until cool set point (upper right 2 digit display with
COOL now flashing under it) is 2° or 3° below room temperature.
This will create a cooling demand. A small triangle to the left of
this COOL icon will flash or come on continually. Flashing means
the equipment is going to turn on but is presently being held off by
a system timer. (See Operational Information for timer descrip-
tions.) Defeat the timer by pressing INCREASE TEMPERATURE
button (up and FAN buttons together). This will make the triangle
stay on and turn Cool Stage 1 on. For actual outputs, refer to Table
2, making sure the correct row from the table is selected. To turn
off, raise cooling set point above the room temperature. Cool Stage
1 and the triangle will turn off within a few seconds.
If system has 2 cooling stages, it will start on Cool Stage 1 and
proceed to Cool Stage 2, 15 minutes later due to a staging timer
which requires 15 minutes between successive stages. The IN-
CREASE TEMPERATURE button (up and FAN buttons) cannot
be used to defeat this timer. This timer can be defeated by reducing
the set point to more than 5° below room temperature, bringing on
a Cool Stage 2 demand within 5 seconds. Remember: 2 stage
cooling units often have a 1 minute off time between lo and high,
so the thermostat’s demand will not show immediately as a change
in the outdoor unit. It will show immediately as an increase in the
indoor fan speed.
—4—
→


