—43—
6. Verify the configuration point by pushing button #1.
The red LED should flash twice to indicate point 2,
and then the green LEDs will flash the current
setting.
NOTE: Since the occupied minimum position MUST
be 1 greater than the IAQ minimum position (item
15), the IAQ minimum position must be changed
first. (IAQ min has a default value of 5%, which is
higher than the 2% value in this example.)
7. Use button #2 (ADVANCE/MANUAL) to get to config-
uration point 15 (IAQ Minimum Position).
NOTE: Before performing Step 8, be ready to push button
#1; there is a limited time window that can easily be missed
when the DS3 green LED comes on, and again when the DS4
green LED comes on.
8. Verify the configuration point by pushing button #1.
The red LED should flash 15 times to indicate point
15, then the green LEDs will flash the current
setting.
9. Next, the green DS3 LED will turn on steady for 2
seconds. During this time, do NOT do anything so
that the position defaults to 0.
10. The DS3 LED will turn off and the green DS4 LED
will go on steady for 2 seconds. During this time,
push button #1 once to set the point to 1%.
11. Wait until the green LEDs turn off then verify the
setting by pushing button #1 to read the value. DS3
should not blink, and DS4 should blink once.
12. Now configure the Occupied Minimum Position to
2%. Use button #2 (ADVANCE/MANUAL) to get to
configuration point 2.
NOTE: Before performing Step 13, be ready to push button
#1; there is a limited time window that can easily be missed
when the DS3 green LED comes on, and again when the DS4
green LED comes on.
13. Verify the configuration point by pushing button #1.
The red LED should flash twice to indicate point 2,
then the green LEDs will flash the current setting.
14. Next, the green DS3 LED will turn on steady for 2
seconds. During this time, do NOT do anything so
that the position goes to 0.
15. The DS3 LED will turn off and the green DS4 LED
will go on steady for 2 seconds. During this time,
push button #1 twice to set the point to 2%.
16. Wait until the green LEDs turn off then verify the
setting by pushing button #1 to read the value. DS3
should not blink, and DS4 should blink twice.
NOTE: Configuration items 2, 15, 11, 12, 18 and 19 (in
Table 37) are dependent upon other items. Before attempt-
ing to change one of these items, be sure to check the value of
the item it depends upon (as described in Example 2 above).
IMPORTANT: During SETUP MODE, changes are allowed
when the DS3 LED and DS4 LED are lit for 2 seconds (as
described in Example 1 and 2 above). During this time, if
button #1 is pushed to change one position and not the other,
the value for that one position will change and the other will
default to zero (unless a dependency prevents the zero). How-
ever, if button #1 is not pushed at all during the 2 seconds
that the green LEDs are lit, the configuration item will not
change.
F. Manual Mode
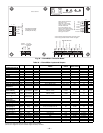
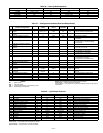
Manual mode is used to control the status of I/O channels for
use in troubleshooting. See Table 38.
Enter the Manual mode by holding down the ADVANCE/
MANUAL (#2) button for at least 3 seconds until all LEDs
flash and then the red LED comes on steady.
NOTE: A user can only enter the Manual mode from the
RUN mode, which is entered by pushing buttons #1 and #2
for at least 3 seconds.
All EconoMi$er+ control outputs are turned off. “I/O
Inputs” 1-5 can be adjusted even if the unit is in operation.
In manual mode, the yellow DS2 LED flashes once to indi-
cate the I/O channel. See Table 38. If the value is less than 5,
the yellow DS2 LED will count out the value using 1-second
flashes. If the value is greater than 4, the yellow DS2 LED
will count out groups of 5 at a high flash rate and then follow
with the additional value at a flash rate of once per
second. For example a flash of 1 indicates Compressor Relay
Output 1.
Push READ/ADJUST button (#1) to read the value. The yel-
low LED will flash the I/O Channel number being viewed.
Once the channel number is displayed it will then turn on
the appropriate green LED (DS3 or DS4) to indicate the sta-
tus of the output. For relay outputs if the DS3 LED is on,
then the output is on. If DS4 is on, then the output is off. The
green DS3 and DS4 LEDs will remain on for about 2 seconds
and if during this time the READ/ADJUST (#1) button is
pushed, then the output will toggle to the alternate state. To
change again, push the READ/ADJUST button and repeat
the test or change the status of the output. As an example,
for channel 5 (EconoMi$er+ control damper motor) use the
READ/ADJUST button to toggle the motor from open to
close in %.
At any time, the ADVANCE/MANUAL (#2) button can be
used to advance to the next SET I/O. To exit the mode, push
and hold the READ/ADJUST and ADVANCE/MANUAL but-
tons (#1 and #2) for more than 3 seconds.
NOTE: After exiting the Manual mode, the controller will
re-initialize and start with all outputs off.
G. Error Mode
The error mode is used to indicate that an error has occurred
The error is indicated by LED #1 red and #2 yellow are on
steady.
Enter the RUN mode by pushing the READ/ADJUST and
ADVANCE/MANUAL buttons (#1 and #2) for at least
3 seconds until all LEDs flash. Next, push and release but-
ton #1 to enter the Read mode. Then push button #2 to
advance to item 20 (“first most recent error”). Determine the
error by reading the value in items 20 to 24 and referring to
the Troubleshooting section.
One the error has been fixed, press buttons #1 and 2 for at
least 3 seconds to exit Read mode. All LEDs will flash.
Enter Setup mode by pressing the READ/ADJUST button
(#1) for at least 3 seconds. All LEDs will flash. Push the
ADVANCE/MANUAL button (#2) to advance to item 20.
Push READ/ADJUST to read item 20.
To reset the error code while the green DS4 LED is on, press
the READ/ADJUST button (#1) once. In addition to resetting
the error mode, this will erase all error codes. Cycling the
power will also erase the error code.
XV. ECONOMI$ER+ CONFIGURATION
For most applications, the factory setting will be used to con-
trol the EconoMi$er+. However, there are 19 different vari-
ables that can be used to configure the control for wide range
of applications. The factory settings and variables are shown
in Table 37.


