


124
CONTENTS
SETTING UP
SEWING
UTILITY
STITCHES
MY CUSTOM
STITCH
TM
(CREATE YOUR OWN
STITCH DESIGNS)
EMBROIDERING
MAINTENANCE
ERROR
MESSAGES
SEWING CHART
PATTERNS
(PROGRAMMED
IN MACHINE)
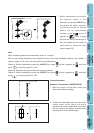
CHANGING THE LIGHT BULB
1
2
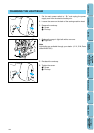
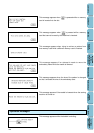
1. Set the main power switch to “ O ” and unplug the power
supply cord from the electrical outlet prior.
2. Loosen the screw on the back of the sewing machine head.
3. Remove the end cap.
1 Screw
2 End cap
1
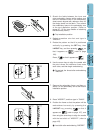
4. Replace the snap-in light bulb with a new one.
1 Light bulb
Note
Light bulbs are available through your dealer. (12 V, 5 W; Parts
code XA2037001)
1
2
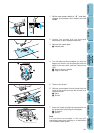
5. Re-attach the end cap.
6. Tighten the screw.
1 Screw
2 End cap