


16
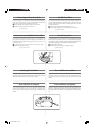
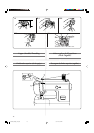
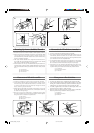
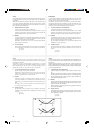
1. Raise the presser foot using the presser foot lifter and turn the
balance wheel toward you (counterclockwise) to raise the thread
take-up lever to its highest position.
2. Pull up the spool pin and place a spool of thread on this pin.
3. Pass the thread through both thread guides: the rear one first,
then the front one. (fig. A)
1 Spool pin
2 Thread guide (rear)
3 Thread guide (front)
4 Thread take-up lever
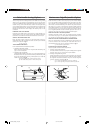
4. Pull the thread down and around the upper tension control dial
from the right to the left so the thread picks up the thread check
spring. (See fig. B.) While holding the thread as shown in fig. C,
pull it between the tension discs.
5 Upper tension control dial
6 Thread check spring
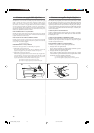
5. Guide the thread to the back of the thread take-up lever and
around to the left (fig. D). Bring the thread through the slit by
pulling it toward you and into the eyelet.
7 Thread take-up lever
6. Bring the thread down and pass it behind the thread guide.
8 Thread guide
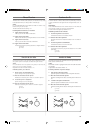
7. Thread the needle from front to back and pull out about 5 cm
(2") of thread as shown in fig. E.
NOTE:
If the thread is incorrectly fed, the thread may break, cause stitches
to be skipped or cause the fabric to wrinkle.
1. Lever le pied-de-biche à l’aide du levier correspondant et tour-
ner le volant à main vers soi (dans le sens contraire aux aiguilles
d’une montre) pour remonter complètement le levier releveur.
2. Lever le porte-bobine et y placer une bobine de fil.
3. Faire passer le fil par les deux guide-fils: d’abord l’arrière puis
l’avant. (fig. A)
1
Porte-bobine
2
Guide-fils (arrière)
3
Guide-fils (avant)
4
Levier releveur de fil
4. Tirer le fil vers le bas et le faire passer par le disque de contrôle
de tension supérieure de droite à gauche afin que le fil attrape
le ressort de vérification (voir fig. B). Tirer le fil entre les disques
de tension, tout en le tenant comme le montre la fig. C.
5
Disque de tension du fil
6
Ressort de vérification du fil
5. Guider le fil vers l’arrière du levier releveur puis autour vers la
gauche (fig. D). Amener le fil vers la fente en le tirant vers soi et
le faire passer par le chas.
7
Levier releveur
6. Tirer le fil vers le bas et le faire passer derrière le guide-fils.
8
Guide-fils
7. Enfiler l’aiguille de l’avant vers l’arrière et tirer environ 5 cm
(2") de fil comme le montre la fig. E.
REMARQUE:
Si le fil n’est pas installé correctement, il peut se rompre, causer
des sauts de points ou des fronces dans le tissu.
1. Levante el prensatelas con la palanca y gire la ruedecilla hacia
usted (en el sentido contrario al de las manecillas de un reloj) para
subir la palanca tirahilos a su posición más alta.
2. Levante el porta carretes y coloque un carrete en el eje.
3. Pase el hilo a través de ambas guías: la de atrás primero y luego la
de delante. (fig. A)
1 Porta carretes
2 Guía hilo (trasera)
3 Guía hilo (delantera)
4 Palanca tirahilos
4. Tire del hilo hacia abajo, pasando por el disco de control de la
tensión superior de derecha a izquierda de tal forma que el hilo
enganche el resorte de comprobación del hilo. (Véase fig. B). Mien-
tras sujeta el hilo tal como indica la fig. C, páselo por los discos de
tensión.
5 Disco de tensión del hilo
6 Resorte de comprobación del hilo.
5. Guíe el hilo por detrás de la palanca tirahilos y por la izquierda
(fig. D). Lleve el hilo por la ranura, tirándolo hacia usted y pasán-
dolo por el agujero.
7 Palanca tirahilos
6. Baje el hilo y páselo por detrás de la guía.
8 Guía
7. Enhebre la aguja de delante hacia atrás y saque unos 5 cm (2") de
hilo tal como indica la fig. E.
NOTA:
Si el hilo está mal enhebrado, puede romperse, saltar puntadas o frun-
cir el tejido.
1. Levante o calcador com a alavanca e gire com a mão o volante, na
sua direção (para a esquerda) para lerantar ao máximo o estica-fio.
2. Levante o porta-carretel e coloque no seu eixo um carretel de li-
nhas.
3. Passe a linha através dos dois guia-fios: primeiro o posterior, e em
seguida o anterior. (fig. A.)
1 Porta-carretel
2 Guia-fio (posterior)
3 Guia-fio (anterior)
4 Estica-fio
4. Puxe a linha para baixo e contorne o botão de regulagem da tensão
da linha superior, da direita para a esquerda, de forma que a linha
passe pela mola de tensáo da linha. (Veja a fig. B.) Segurando na
linha da forma indicada na fig. C, puxe-a com força para encaixala
entre os discos tensores (do botão).
5 Botão tensor da linha
6 Mola de tensáo da linha
5. Guie a linha para a parte de trás do estica-fio e em seguida para a
esquerda (fig. D); Passe-a através da fenda puxando-a para si e enfie-a
no orifício do estica-fio.
7 Estica-fio
6. Puxe a linha para baixo e passe-a por detrás do guia-fio.
8 Guia-fio
7. Enfie a linha na agulha da frente para trás e puxe cerca de 5 cm de
linha, conforme mostra a fig. E.
NOTA:
Se a linha não estiver corretamente passada, poderá partir-se provocan-
do falha de pontos ou franzir o tecido.
LS2125_EFSpPo_1-23.p65 03.11.13, 3:16 PM16