


31
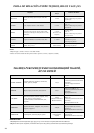
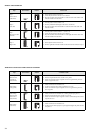
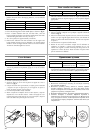
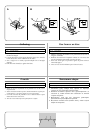
MAKING A BUTTONHOLE
Step Sewn Portion Pattern How to Sew
Step a
(Front end of
buttonhole)
1. Set the pattern selection dial to a.
2. Lower the presser foot and sew 5 to 6 stitches.
3. Stop the machine when the needle is at the left side of the stitches and
raise the needle from the fabric.
Step b
(Left side)
1. Turn the pattern selection dial to b.
2. Sew the predetermined length of the tailor’s chalk line.
3. Stop the machine when the needle is at the left side of the stitch and
raise the needle.
Step c
(Back end of but-
tonhole)
1. Turn the pattern selection dial to c (same as a).
2. Lower the presser foot and sew 5 to 6 stitches.
3. Stop the machine when the needle is at the right side of the stitch and
raise the needle from the fabric.
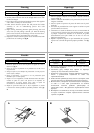
Step d
(Right side)
1. Set the pattern selection dial to d.
2. Sew the right side until the needle reaches the stitches formed in step a.
a
ac
a
c
b
b
c
ac
a
c
d
d
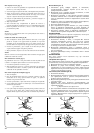
MARCHE A SUIVRE POUR FAIRE UNE BOUTONNIERE
Step Sewn Portion Pattern Comment coudre
1er temps
(barre d’arrêt
avant de la
boutonnière)
1. Mettre le sélecteur de modèle sur a.
2. Abaisser le pied-de-biche et coudre 5 ou 6 points.
3. Arrêter la machine lorsque l’aiguille se trouve à gauche des points et
relever l’aiguille du tissu.
2ème temps
(côté gauch)
1. Mettre le sélecteur de modèle sur b.
2. Coudre la longueur de la ligne pré-définie à la craie.
3. Arrêter la machine lorsque l’aiguille se trouve à gauche des points et
lever l’aiguille.
3ème temps
(barre d’arrêt
arrière de la
boutonnière)
1. Mettre le sélecteur de modèle sur c (même position que pour a).
2. Abaisser le pied-de-biche et coudre 5 à 6 points.
3. Arrêter la machine lorsque l’aiguille se trouve à droite des points et lever
l’aiguille du tissu.
4ème temps
(côté droit)
1. Mettre le sélecteur de modèle sur d.
2. Coudre la lèvre droite jusqu’à ce que l’aiguille atteigne les points formés
à la phase a.
a
ac
a
c
b
b
c
ac
a
c
d
d