


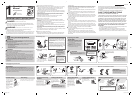

Thread tension
Correct tension ■
Correct tension is important as too much or too
little tension will weaken your seams or cause
puckers on your fabric.
Lower thread
Upper thread
Surface of
fabric
Back of fabric
Upper tension is too tight ■
Loops will appear on the surface of the fabric.
Note
If the bobbin thread was incorrectly ●
threaded, the upper thread may be too
tight. In this case, refer to “1 Lower
threading” of Sheet 1 to rethread the
bobbin thread.
Solution: Reduce the tension by turning the
upper tension control dial to a lower number.
Upper
thread
Lower
thread
Loops appear on
surface of fabric
Back of fabric
Surface
of fabric
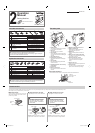
Operation
Manual
Sewing Machine
2
Video tutorials included on
DVD.
Solution: Increase the tension by turning the
upper tension control dial to a higher number.
Upper
thread
Lower thread
Back of fabric
Note
If the upper thread was incorrectly ●
threaded, the upper thread may be too
loose. In this case, refer to “2 Upper
threading” on Sheet 1 and rethread the
upper thread.
Surface
of fabric
Upper tension is too loose ■
Loops appear on the back of the fabric.
Loops appear
on back of
fabric
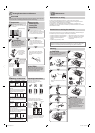
No. Part Name
Part Code
Americas Others
1 Zigzag foot “J” (on machine) XC4901-121
2 Buttonhole foot “A” X59369-321
3 Zipper foot “I” XE9369-001
4 Bobbin (One is on machine) SA156 SFB:XA5539-151
5 Needle set (90/14 needle)
3-piece set: XE5328-001
2-piece set: XE7064-001
6 Screwdriver XF3557-001
7 Foot controller
Model KD-1902 for 110-120V area
KD-1902 for 110-127V area (Brazil only)
Model KD-2902 for 220-240V area
No. Part Name
Part Code
Americas Others
1 Darning Plate XC6063-021
2 Button sewing foot “M” XE2137-001
3 Walking Foot SA107 F034N: XC2165-002
4 Quilting Foot SA129 F005N: XC1948-052
5 1/4-inch Quilting Foot SA125 F001N: XC1944-052
6 Narrow Hemmer Foot SA127 F003N: XC1945-052
7 Blind Stitch Foot SA134 F018N: XC1976-052
8 Quilting guide SA132 F016N: XC2215-052
1 2 3 4 5 6 7
Note
The included accessories vary depending on the machine model. ●
The foot controller part code differs depending on the country or region. Contact your ●
dealer or the nearest authorized service center.
1 2 3 4 5 6 7 8
Note
The optional accessories are to be purchased separately. Depending on the model you ●
purchased, some accessories may be included with your machine.
Included accessories
Optional accessories
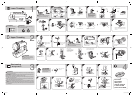
The main parts
1
2
3
4
6
7
8
5
0
9
D
C
F
A
E
B
Bobbin windera
This winds the thread onto the bobbin
for use as the lower thread.
Spool pinb
This holds the spool of thread.
Thread guidec
This is used when winding the thread
onto the bobbin and then threading the
machine.
Thread take-up leverd
Upper tension-control diale
This controls the tension of the upper
thread.
Thread cutterf
Pass the threads through the thread
cutter to cut them.
Flat bed attachment with accessory g
compartment
Presser footh
Reverse sewing leveri
Push this lever to stitch in the reverse
direction.
Buttonhole ne-adjustment screwj
Pattern selection dialk
Rotate the dial in either direction to
choose the stitch you want.
Handwheell
Used to manually raise and lower the
needle.
Main power and sewing light switchm
You can turn the main power and sewing
light switch on and off.
Foot controller jack / socketn
Plug in the foot controller plug and
connect the machine to the power
supply.
Presser foot levero
Used to raise and lower the presser foot.
Foot controllerp
You can use this to control the sewing
speed, and to start and stop sewing.
Flat bed attachment ■
The accessories can be stored in a compartment inside the at bed attachment.
Slide the
attachment to the
left to open.
Storage
compartment
888-X53/X54/X55/X56
XF4097-001
The tension of the thread will affect the quality of your stitches. You may need to adjust it when you change fabric or thread. We recommend that you do a
test sample on scrap of a fabric before you start to sew.
XF4097-001.indd 1 5/7/2012 10:15:00 AM