


1
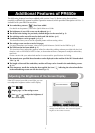
Additional Features of PR650e
The following features have been added with version 2 and 3. Before using the machine,
carefully read both this manual and the Operation manual (which provides descriptions of Ver. 1)
included with your PR650e machine.
■ Ten embroidery patterns ( ) have been added.
For details on the patterns, refer to the Quick Reference Guide.
■ The brightness of your LCD screen can be adjusted. (p. 1)
■ The thread color settings for previously stitched designs can be canceled. (p. 2)
■ The stitching can be moved forward or backward 500 stitches. (p. 3)
■ Combined patterns can be grouped. (p. 3-p. 5)
This function allows you to sew the repeated pattern without sorting colors.
■ The settings screen now has a total of six pages.
For page illustrations and content, refer to the "Quick Reference Guide" for the PR650e. (p.9)
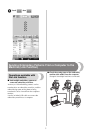
■ The Link function has been added. (p. 5)
This function allows embroidery patterns edited in embroidery editing software provided with the Link
function, such as PE-DESIGN NEXT or later, to be transferred from a computer to multiple embroidery
machines.
Please consult with your authorized retailer for exact machine specifications for linking.
■ The manufacturer specified thread numbers can be displayed on the machine if the "PES" thread code is
"ON". (p. 10)
■ The length of time until the embroidery machine will stop can be viewed in the embroidering screen.
(p. 11)
■ If the temporary needle bar setting has been applied, the icon ( ) indicating the selected needle bar
in the embroidering screen can now be viewed. (p. 11)
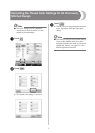
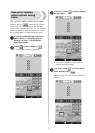
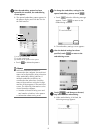
Adjusting the Brightness of the Screen Display
If the LCD screen is too dark or too light, you can
now adjust the brightness of the screen display.
1
Press .
2
Display page 5 of the settings screen.
3
Press or to adjust the brightness of
the screen display.
* The screen will appear dimmer if the number on the
settings screen decreases. The screen will appear
brighter as the number increases.