


12.
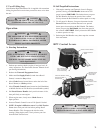
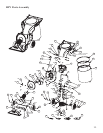
D. Directions for removing the Fan
and reinstallation
1. Remove spark plug wire from spark plug.
2. Remove nozzle assembly.
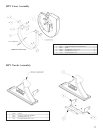
3 Remove front plate assembly.
4. Remove the bolt that secures the fan to the engine
crankshaft.
5. The fan has a 3/4-16 nut welded on the fan hub. Insert a
3/4-16 x 5" long grade 5 (or better) bolt and jack or push
the fan off the engine. (Little Wonder P/N 910505 pressure
screw is recommended.)
WARNING DANGER
TURN OFF ENGINE BEFORE YOU DISCONNECT
HOSE, AND MAKE SURE ALL MOVING PARTS
COME TO A COMPLETE STOP.
WARNING DANGER
BE SURE THROTTLE IS IN “STOP” POSITION, AND
FAN HAS COME TO A COMPLETE STOP.
WARNING DANGER
DISCONNECT THE SPARK PLUG WIRES BEFORE
ANY CLEANING OR MAINTENANCE!
WARNING DANGER
WEAR GLOVES, THE CLOG MAY CONTAIN
SHARP MATERIALS.
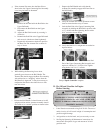
C. Removing Blockage in Moving Parts
1. Support the housing with 2x4 lumber such that front wheel
are 1” above the ground.
2. Chock the rear wheels with blocks.
3. Remove the nozzle assembly from the front plate.
(See Assembly Instruction 6.)
4. Remove the front wheel assembly.
5. Remove the front plate.
6. Wear gloves and clear out debris from around the impeller
and housing.
6. Replace damaged or worn fan with a new one. If during
fan removal the key (#915) was removed from the keyway,
reinstall it by applying a few drops of the Loctite 380
instant adhesive (“Black Max” P/N 38050) on the key, and
load the key in the keyway of the shaft. (Cure time is
approx. 1 min.)
7. Use a new bolt (#600524) (add Loctite 242 to new bolt)
and washer (#910527) and complete fan installation.
Insure a secure fit upon re-assembling. Torque bolt to
39-51 Ft. lbs.
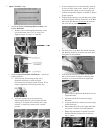
E. Changing V-Belt
1. Turn off engine. Remove Spark Plug Wire from Spark
Plug. Chock or block wheels of vacuum to prevent it
from rolling.
2. Remove Debris Bag from vacuum.
3. Remove 3 hex head bolts that attach Belt Guard to
Deck. (Use 7/16” wrench or socket.) Set Belt Guard aside.
Note how V Belt goes around each of 4 pulleys and how
it “twists.”
4. Remove 4 hex head bolts that attach Recoil Starter Cover
to Engine Standoffs. (Use 8 millimeter nut driver, socket or
wrench.) Remove Recoil Starter Cover.
5. Loosen (but do not remove) 2 hex head bolts that attach
Fixed Idler Bracket to Deck. (Use 7/16” wrench or socket.)
This allows clearance for belt to be removed.
6. Press down on Belt Tension Lever and lift V Belt off its
pulley. Release Belt Tension Lever. Remove V Belt from
Engine Pulley.
7. Remove V Belt from large horizontal pulley of transaxle
(under Deck.) Pushing V Belt forward with both hands,
then lifting V Belt up, then pulling V Belt backwards
should remove it from large pulley. Remove V Belt from
under Deck.
8. Reverse above steps to replace V Belt. Install V Belt with
the same “twists” that the old V Belt made around the
pulleys. Make sure the “V” side of the V Belt goes into
each pulley. Before replacing Belt Guard or starting
engine, pull Recoil Starter Handle several times to make
sure V Belt rides in the grooves of each pulley.
9. Make sure Belt Tension Lever and return spring operate
smoothly. If it sticks or does not operate smoothly,
lubricate the Belt Tension Lever and its mounting bracket
with a few drops of Motor Oil, or other medium weight
oil. Push Belt Tension Lever down and release it several
times to allow lubrication to penetrate between lever and
mounting bracket. Proper operation of the Belt Tension
Lever and its return spring will insure that your V Belt
will operate properly and last many hours of use.