


C. VERTICALLY INTO EXISTING MASONRY
FIREPLACE
NOTE: Follow L-Vent chimney manufacturer’s instructions.
1. Have the masonry chimney inspected by a qualified
chimney sweep or installer to determine its structural
condition.
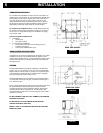
2. You will need a pipe length equal to the chimney height
from the hearth. If outside combustion air is to be used, you
will need a pipe length equal to the chimney height plus 18
inches.
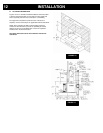
3. Install a blanking plate and the chimney pipe, and if used
the outside air pipe, as shown in Figure 11.
4. Attach the L-Vent adapter, a section of pipe and clean out
tee, making sure the clean out tee is centered in the
chimney flue area. Use RTV, metallic tape, and a minimum
of three self-taping screws at all joint connections to ensure
a tight seal.
5. Position the stove, adhering to the clearances in Figures 1
& 2.
6. Measure and build chimney top plate. Cut out holes for
chimney pipe, and if used the outside air pipe. Install and
seal with non-hardening mastic to prevent water leakage.
Install vent cap.
D. INSTALLATION THROUGH SIDE OF MASONRY
CHIMNEY
NOTE: Follow L-Vent chimney manufacturer’s instructions.
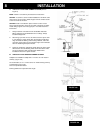
1. Position the stove, adhering to the clearances in Figures 1
& 2. Mark the center of the hole where the pipe is to pierce
the masonry chimney.
2. It will be necessary to break out the masonry around the
location of the pipe center mark. Use a 4-inch diameter
hole for 3-inch pipe and 5-inch diameter hole for 4-inch
pipe.
3. Measure and build chimney top plate. Cut out holes for
chimney pipe, and if used the outside air pipe.
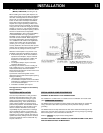
4. Install the tee on the bottom of the vertical pipe system and
lower it down the chimney until the center branch of the tee
is level with the center of the hole in the masonry, as
shown in Figure 12.
5. Install and seal the top plate from step 3 with non-
hardening mastic. Slip the storm collar over the pipe, and
while holding the pipe at the proper elevation, affix the
collar with a minimum of three ¼” stainless steel sheet
metal screws. Seal all joints and seams around the collar.
6. Connect the horizontal pipe by pushing it through the hole
in the masonry and lining it up with the branch in the tee.
Push the pipe into the tee while twisting it to lock it into the
tee.
7. If desired, once the horizontal pipe is in place, the space
between the pipe and masonry may be filled with high-
temperature grout.
8. Install the trim collar. An adjustable pipe length and adapter
may be needed to finish the connection to the stove.
INSTALLATION
9
Figure 11
Figure 12