


14 en | Operation UHI-SBG-0 Series
September 15, 2006 | F01U032279_01 Installation Manual Bosch Security Systems, Inc.
6. Secure the housing to the mount by attaching two 1/4-20 x 0.50 in. screws and two 1/4
in. washers. The washers must be used for the screws to thread properly.
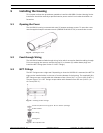
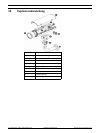
6.1 Installing the Camera Tray
Verify operation of the camera and lens and adjust the camera focus and iris as necessary. See
the instruction manual for your specific camera.
Installing the Camera Tray
1. Slide the camera tray with attached camera (see Section 5.5: Attaching the Camera and
Spacer to the Tray) into the slot of the housing.
2. Secure the camera tray with screw.
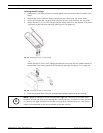
6.2 Connecting the Wires
Before proceeding, verify that the BNC for the Video Coax Cable is separated from the mains
power connections / circuitry and there is a physical spacing barrier between cables. For wir-
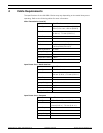
ing video coax connections, use only the cables specified in Section 4: Cable Requirements.
Connecting the Wires
1. Attach the BNC connector to the coax.
2. Connect the coax cable to the camera.
3. Connect the power leads from the source to the terminated block.
4. Connect the wires from the terminal block to the camera.
5. Tighten the fittings to 8.5 N.m to 9.0 N.m (75 in. lb to 80 in. lb). The torque rating is
approximately 1 to 1-1/2 turns past the point where the fitting starts to grip the wire.
• Tighten all fittings to ensure a liquid-tight seal. Failure to do so could allow moisture
to enter the housing and damage electronic parts, camera, and lens.
• If a sealant is used, be sure it is a neutral cure type. Sealants that release acetic acid
may harm camera electronics.
• Use of drip loops is recommended on the wiring outside of the rear end cap.
6. Use the provided hole plugs to plug any unused holes.
7. Close the cover and secure the tamper-resistant screws with the supplied wrench.
7 Operation
These housings require no operational adjustments other than camera/lens adjustments.
8 Maintenance
No special maintenance is required other than occasional cleaning of the window. Regularly
scheduled maintenance will help prolong the operation life of this unit. Clean the viewing win-
dow as needed with a mild, nonabrasive detergent in water and a soft cloth.
i
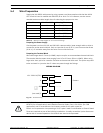
NOTE! The outermost set of 1/4-20 threaded holes are for mounting to feed-through mounts
and the innermost 1/4-20 holes are for mounting to all other mounts and pan/tilts (see Figure
1). For mounting to all other mounts and pan/tilts, refer to the specific device’s installation
guide.