


D268, D269 Operation and Installation
Copyright © 2001 Radionics Page 11 74-04758-000-H
D268, D269
Installation
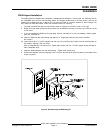
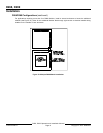
D269 Keypad Installation
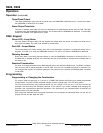
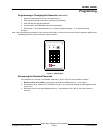
The D269 Keypad is shipped with a faceplate, a backbox/circuit assembly, a 4-wire cable, two mounting screws,
two collapsible clips, and two wall mounting plates. The keypad installs flush to the wall surface, and may be
installed into a single-gang box, if desired. Do not mount the D269 in a location exposed to direct sunlight, this
may make the LEDs less visible. Follow the directions below for mounting.
1. To install the D269 flush with the wall surface, make an opening in the wall 2" wide x 3.25" high.
2. Route the 4-wire cable through the wiring opening in the backbox, and plug it into the 4-pin connector on the
circuit board.
3. If you are installing the D269 into a single-gang wall box, see step 3a. If you are installing it without single-
gang box, see step 3b.
3a. Insert the D269 into the wall opening and attach it to single-gang wall box with screws provided.
Go to step 5.
3b. Insert screws (#6 x 2" screws supplied with the unit) into mounting holes. Place the wall mounting plate on
the backbox, aligning it with the screw.
Slide a collapsible clip over each screw. Tighten each screw until firm. Do NOT tighten screws enough to
bend collapsible clips.
4. Insert the D269 assembly into the wall opening. Tighten each screw firmly.
5. Position the faceplate over the assembly, hook it over the top and gently push the bottom of the plate until it
snaps into place.
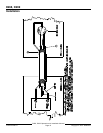
Figure 6: Wall Mounting the D269 Keypad