


-8-
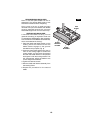
4. Rotate the blade drum 180° and repeat
the procedure to remove the second
blade.
INSTALLING AND ADJUSTING MINI
CARBIDE BLADES
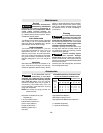
If the blades and/or holder are gummed and
difficult to remove, remove the clamping
jaws and screws and clean all surfaces with
mineral spirits; lacquer thinner or alcohol, as
this will ensure an accurate blade setting
and proper tool performance. (See
REMOVAL OF MINI TC BLADE HOLDERS
AND RETAINERS)
To install, carefully slide the blades onto
ridges on the blade holders.
To ensure proper operation and an even cut,
the blades must be positioned so that they
are:
• Centered relative to the front and rear
shoes.
• Aligned with each other.
• Positioned so that they will not touch
against any part of the planer when
rotated.
• Evenly pressed back toward the holder to
ensure that they are level.
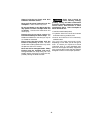
INSTALLATION PROCEDURE
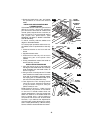
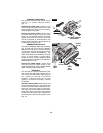
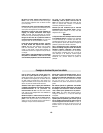
1. Align the groove on top of the blade with
the ridge of the blade holder and carefully
slide the blade onto the blade holder, as
shown in Figure 6.
2. Using a block of wood push the TC blade
back towards the blade holder so that the
inner side of the blade is pressed against
the sloping part of the blade holder. (This
will ensure that the blades are level.)
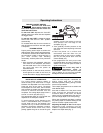
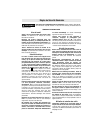
3. Then tighten the Torx clamping screws
using the correct tightening sequence
(1,2,3), as shown in Figure 4, and your
planer is ready for use.
Blade Retainer Screws - Under normal
circumstances, the position of the retainer
on the mini TC blade holders does not
require readjustment. If fact, the screws that
attach the retainer to the blade holder are
factory sealed with a yellow fastening
compound that should not be disturbed.
However, if you believe that adjustments
must be made, proper adjustment is critical,
and it is best performed by a Bosch Factory
Service or Bosch Authorized Service Center.
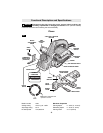
FIG. 4
FIG. 5
FIG. 6
CLAMPING
SCREW
FRONT
SHOE
BLADE
HOLDER
RIDGE
CLAMPING
JAW
BLADE
DRUM
BLADE
WRENCH
BLADE
HOLDER