


9
5. Foreign materials of a conductive nature such as, but not limited to, steel wool,
aluminum foil, or any buildup of metallic particles should be kept away from charger
cavities. Always unplug the charger from the power supply when there is no battery
pack in the cavity. Unplug charger before attempting to clean.
6. Do not freeze or immerse charger in water or any other liquid.
WARNING: Shock hazard.
Do not allow any liquid to get inside charger.
CAUTION:
Never attempt to open the battery pack for any reason. If the plastic housing
of the battery pack breaks or cracks, return to a service center for recycling.
TO MAXIMIZE BATTERY LIFE:
1. Remove the batteries from the charger after the charging is completed.
2. Store the batteries at room temperature or below.
3. Recharge discharged batteries within 1 week. Battery life will be greatly diminished if
the battery sits too long after being discharged.
OPERATING INSTRUCTIONS
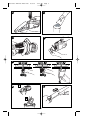
INSTALLING AND REMOVING THE BATTERY PACK (FIGURE D, E)
CAUTION:
Make certain the lock-off button is engaged to prevent switch actuation before
removing or installing battery.
Installing the battery pack:
Insert the metal terminal end of the battery pack into the product until you hear the lock
snap into place and the VPX
TM
logo shows through the window as shown in figure D.
CAUTION: The battery can only be inserted in one direction. If the battery does not fit,
remove and reverse the orientation. Do not force it.
Removing the battery pack:
Press the release button as shown in figure E and firmly pull the battery pack out of the
handle. Insert the battery pack into the charger (figure B) as described in the charger
section of this manual.
SWITCHING ON AND OFF (FIGURE F)
To start, slide the On/Off switch forward (i.e. “O”= Off, “I” = On). To stop, slide the switch
back.
If the tool does not turn on, check to see if one of the two Black & Decker VPX
TM
battery
packs is depleted. To determine which pack is depleted, pull the trigger and observe the
label on the back of the tool above the batteries. Remove the battery pack corresponding
to the the light which is illuminated and place in charger. To insure optimal runtime,
remove both battery packs and place in charger.
BATTERY LED INDICATORS (FIGURE G)
This product is equipped with electronics which will shut-off the power when either battery
pack is depleted. If the tool stops suddenly, one of battery packs may be depleted. An LED
on the back of the tool handle will indicate which battery pack is depleted. In order to
illuminate the indicator the trigger must be pulled. To insure optimal runtime, remove both
battery packs and place in charger.
Two battery indicators are located on the back of the tool above the batteries. If battery
power is depleted while using your drill driver, you can determine which battery needs to
be recharged.
To check battery status:
• Squeeze the trigger and observe which LED is illuminated.
• Remove the battery pack corresponding to the the light which is illuminated
• Place battery pack in charger.
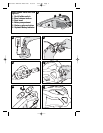
CLEANING THE PRODUCT (FIGS . H-M)
WARNING: Never use the hand vac without its filters.
NOTE: The filters are re-usable. Do not confuse them with disposable dust bags, and do
not throw them away when the product is emptied. We recommend that you replace the
filters every 6-9 months depending on frequency of use. (Use catalog number VF08 filter).
FIG. H - Remove the dust bowl by pressing the dust bowl release button and pulling the
bowl down and out. To replace the bowl, place it back onto the handle and click firmly
into position. Important: For best vacuum results, empty bowl after every use.
FIG. I - Empty the debris from the bowl and wash if necessary (see figure L).
90521333 VPX2102 Hand Vac 8/2/07 7:44 AM Page 9