Power Cord Quick Release
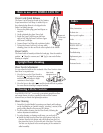
The Power Cord is stored at the side of the Canister,
looped around two Cord Wraps. A molded clip on
the polarized plug allows it to be clipped to the
Power Cord during storage.
1. Remove the plastic plug guard and dispose or
recycle it.
2. Unclip polarized plug from Power Cord.
3. Rotate the Upper Cord Wrap one-half turn
right or left, and slip Power Cord from Upper
and Lower Cord Wraps.
4. Connect Power Cord Plug with a polarized outlet.
5. To keep the Power Cord out of your way while
cleaning, place it in the cord hook at the top/back of the handle.
Power Switch
The Power Switch is located just below the hand grip. Move the switch to
position “ ” [down] to vacuum, and “ ” [up] to turn unit off when
cleaning is complete.
Floor Nozzle Adjustment
You can adjust the brush on the underside of the Floor Nozzle to clean
bare floors or carpeted areas.
1. Move the lever on the Floor Nozzle to
the left ( ) for bare floor vacuuming,
and the brush will adjust to slight
variations in floor height.
2. Move the lever to the right ( ) and the brush will lock in position
for more effective cleaning of carpeted surfaces.
Your BISSELL EASY VAC
™
is not only a convenient upright bare floor
and carpet cleaner, it’s also a versatile floor/above floor vacuum
cleaner when you detach the lightweight canister.
Floor Cleaning
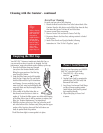
1. Detach the Upright Handle by pressing your thumb and forefinger
on the lock buttons on Canister (using a “pinching” motion) while
gently pulling Handle off square end of Canister.
2. For floor surface cleaning, use the Floor Nozzle, following the
surface adjustment instructions.
3. For edge cleaning or cleaning small areas, you need only to:
■
Detach the Hose from the Hose Port at the bottom/ back of the
Canister. Press the lock button and pull the Hose from the Port,
then insert the Crevice Tool into the end of the Hose. The Crevice
Tool also can be placed in the round opening of the canister for
added versatility.
5
Index
Safety instructions . . . . . . . . . .2
Product view . . . . . . . . . . . . . . .3
How to put it together . . . . . . . .4
Index . . . . . . . . . . . . . . . . . . . . .5
How to use your
BISSELL EASY VAC
™
. . . . . . .5-6
Maintenance . . . . . . . . . . . . . . .7
Troubleshooting . . . . . . . . . . . . .8
Replacement parts . . . . . . . . . . .9
Warranty . . . . . . . . . . . . . . . . .10
Customer Service . . . . . . . . . . .10
How to use your BISSELL EASY VAC
™
BARE FLOOR
CARPET
Upper and
Lower Cord
Wraps
Floor Nozzle
Adjustment Lever
Upright floor cleaning
Cleaning with the Canister


