


5 6
3. Plug the power supply cord (the end which does not have
prongs extending from it) into rear of the unit and into the
most convenient 120V AC grounded wall receptacle. The
power light will illuminate when the power button is pushed.
4. To set the digital humidistat, see the section title "Setting
the Digital Humidistat Control." To operate without the digital
humidistat simply press the mode button until the desired
speed is displayed on the left side of the control panel.
NOTE: If AUTO appears at the bottom left of the control panel
then the humidistat is in AUTO mode, press the mode button
until the AUTO disappears. The unit will now be in manual
mode at HIGH speed. Continue pressing the mode button
to choose MED, or LOW manual settings.
5. When all the water in the reservoirs
has been used, the refill light will
illuminate. The fan will operate on
low speed and circulate filtered air
in the room; however, no moist air
will be produced until the water
reservoirs are refilled. Follow
instructions under "Filling the Water
Reservoir.”
FILLING THE WATER RESERVOIR
1. Be sure the unit is off and disconnected from
the electrical outlet.
2. The water reservoirs can be filled by removing the reservoir
cap.To remove the reservoir cap, twist it counter-clockwise
approximately 1/4 turn. Hold the reservoir upside down
under the faucet to fill. A deep sink or bathtub is required.
After filling the water reservoir, replace the reservoir cap.
Make sure the large O-ring is in its correct position, then
align the arrows on the cap and reservoir and turn
clockwise 1/4 turn.
3. Replace each full reservoir on to your humidifier. Turn the
humidifier back on and set at the desired level. After a few
minutes, the water tray will fill and the refill light will turn off.
SETTING THE DIGITAL HUMIDISTAT CONTROL
The programmable digital humidistat is designed to
operate between 30% and 65% relative humidity range.
The recommended setting is between 40% and 45%.
1. To program a preset humidity level, press the mode button
until AUTO appears at the bottom left of the control panel.
The AUTO setting will begin with HIGH. Continue pressing
the mode button to choose AUTO MED, or AUTO LOW.
2. Once you have chosen your AUTO speed press the + or –
buttons to choose your humidity setting. The humidity
Figure 3
settings can be set in multiples of 5, beginning with
lowest setting 30% and ending with the highest setting
65%. Choose the desired setting and your programmable
humidistat is now set.
NOTE: When the humidity level in the room is less than
the humidity level you have programmed the humidifier will
continue to produce moisture. Once the pre-set humidity
level is met, the humidifier will stop producing moisture. As
the room humidity approaches the humidity the units speed
will decrease if it has been set at Auto High or Auto Low.
REPLACING THE AIR FILTER CARTRIDGE
To keep your unit operating at peak efficiency, the dual filter
cartridge should be replaced when indicated by the filter
monitor, located on the front
of your unit.
1. Push the power button
so the power light is off
and disconnect the unit
from the electrical outlet.
2. Open the filter access door
and remove the used filter.
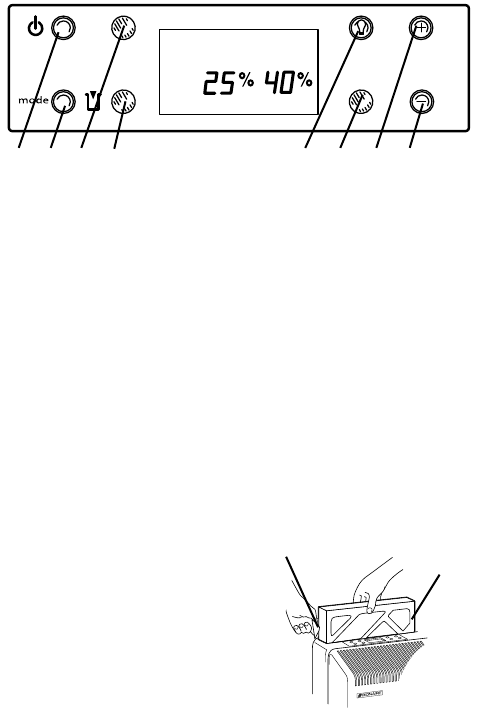
3. Remove the replacement
cartridge from the printed box.
Discard any protective
plastic wrapping. Install the
cartridge by sliding it completely into the unit, as shown in
Figure 5, with the electret side of the filter cartridge (white
side) facing towards the rear of
the unit. Do not remove the filters from the cardboard
frame, this will destroy the cartridge.
4. Close the filter access door.
5. Plug the unit back into the electrical outlet and push the
Power button to turn it on.
High
Auto
Room
Humidity
Set
Humidity
Figure 4
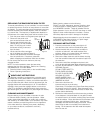
A. Power Button
B. Mode Button
C. Power Light
D. Refill Light
E. Nightlight Button
F. Nightlight Sensor
G. Set Humidifier
(Higher)
H. Set Humidifier
(Lower)
A
B
C
D
E
F
G
H
Figure 5
Filter Access
Door
Air Filter
Cartridge