


3
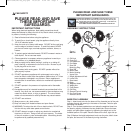
FAN HEAD ASSEMBLY
Step 1: Position the rear grill over the motor shaft, making
certain the cut outs in the center of the grill fit over the prongs on the
motor housing. Please make sure the rear grill fits securely against the
motor housing.
Step 2: Secure the rear grill in its place using the rear grill mounting-
ring. Turn this ring clockwise and tighten firmly.
Step 3: Slide the fan blade, with the hollowed interior of the blade fac-
ing toward the rear grill, firmly onto the motor shaft. Make sure that the
pin through the motor shaft aligns with the groove in the back center of
the fan blade.
Step 4: Secure the fan blade onto the motor shaft by firmly tightening
the fan blade nut.
NOTE: TURN THE FAN BLADE NUT COUNTER-CLOCKWISE
Step 5: Align the tabs on the grills, and press grills firmly against each
other. (Figure 2)
Step 6: Place grill ring over attached front and rear grills with connect-
ing link centered over the top of the grill. Make sure to fit the grooves
on the underside of the grill ring over the edge of the front and rear
grills. (Figure 3)
Step 7: Secure the grill ring to the front and rear grills using the fixed
screw. Place the trim cap over the connecting link and snap into place.
(Figures 4 & 5)
FINAL ASSEMBLY
FOR REMOTE VERSION
Step 1: Slide the remote control housing over the upper pole and
secure the housing with the fan post screw.
FINAL ASSEMBLY
FOR NON-REMOTE VERSION
Step 1: Slide the threaded end of the fan head pole, into the top of the
pole. Holding the neck of the fan, turn it counterclockwise until it locks
into position.
NOTE: Make sure the top of the upper pole is facing away from you
when placing the fan head into the pole.
TRIM CAP
Figure 2
Figure 3
Figure 4
Figure 5
4
OPERATING INSTRUCTIONS
FOR REMOTE VERSION
Step 1: Insert 2 AAA batteries into the back of the remote control.
Remote Control: Your remote control requires 2 AAA batteries for operation.
To install the batteries, simply depress the back of the remote with your
thumb on the spot marked OPEN. Insert batteries according to the diagram
shown inside. Replace cover.
Step 2: Set the fan base on a dry level surface.
Step 3: Plug cord into any standard 120V AC outlet.
Step 4: To turn the fan on press the POWER button on the remote control
or on the touch-key pad.
Step 5: The speed is adjustable by pushing either the speed button on the
remote control, or on the SPEED button on the touch-key pad. Push this
button first for LOW, again for MEDIUM, and a third time for HIGH. Push a
fourth time to repeat the sequence. To turn the fan OFF, push the OFF
button on the remote control, or on the touch-key pad.
Step 6: To oscillate the fan head, push the button marked OSCILLATE on
the remote, or OSCILLATE on the touch-key pad. Push a second time to
stop oscillation.
Step 7: This fan is equipped with a 4-setting timer. (1hr, 2hr, 4 hr, 8hr). To
activate the timer, push the TIMER button on the remote control, or the
TIMER button on the touch-key pad. Continue to push the TIMER button
to cycle through your setting options. Push the button twice to repeat the
sequence.
Step 8: For a natural breeze movement, push the button marked MODE
on the remote control or the touch-key pad. This BREEZE mode will imi-
tate wind gust by varying the fan speeds between fast and slow. By
pressing the MODE button a second time, you activate the SLEEP setting.
This function slows the fan speed down, and when used in conjunction
with the timer settings, will ultimately turn the fan off. Press the Mode
button a 3rd time for BREEZE and SLEEP combined.
NOTE: Timer can be used in conjunction with several other functions. For
example: Sleep + 4hr. TIMER causes the fan to gradually slow down over
4 hours and eventually turn off.
OPERATING INSTRUCTIONS
FOR NON-REMOTE VERSION
Step 1: Set the fan base on a dry, level surface.
Step 2: Please make sure the Speed Control Knob is in the "Off" position. Plug
the cord into any standard 120 V A/C outlet.
Step 3: The SPEED is adjusted by moving the knob left or right to the
desired setting.
Step 4: The OSCILLATION Knob is located on the top of the fan motor hous-
ing. To start oscillation, push knob down. To stop oscillation, pull knob up.
ADJUSTMENT INSTRUCTIONS
TILT ADJUSTMENT
Follow these instructions to tilt the fan head for upward angle
air movement.
Step 1: To change the tilting angle of the fan head, move the fan head to the
desired position. This will work only on RC model On the non-remote,
the customer needs to loosen the tilt adjustment knob first.
BSF1731RC/RC-CN_eng.qxd 12/31/01 4:24 PM Page 3