


Manual 2100-420H
Page 14 of 34
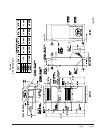
INSTALLATION INSTRUCTIONS
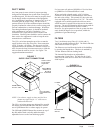
MOUNTING THE UNIT
When installing a QT
EC
unit near an interior wall on the
left side, a minimum of 8 inches is required; 12 inches is
preferred.
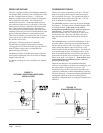
When installing a QT
EC
unit near an interior wall on the
right side, a minimum of 18 inches is required as
additional space is required to connect the side drain. If
the rear condensate drain kit QCDS48 is used the
minimum can be reduced to 8 inches.
This clearance is required to allow for the attachment of
the unit to the sleeve and side trim pieces to the wall.
This unit is to be secured to the wall sleeve with
mounting brackets provided. The unit itself, the supply
duct and the free blow plenum are suitable of “0”
clearance to combustible material.
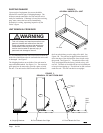
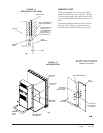
Following are the steps for mounting the QT
EC
, for
reference see Figure 12 (page 13).
1. Attach mounting brackets to the wall sleeve with
screws provided.
2. Position the unit in front of the sleeve with the
condenser section toward the sleeve.
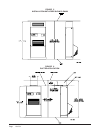
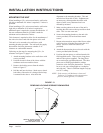
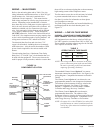
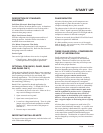
3. Remove the locking screws from the wheels.
Refer to Figure 13.
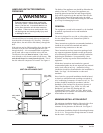
4. Roll the unit into the sleeve. Make sure to check
both sides of the unit as it is being rolled to keep
it centered in the sleeve. Also check the
alignment to the mounting brackets. This unit
must be level from side to side. If adjustments
are necessary, shim up under the rollers with
sheets of steel or any substance that is not
affected by moisture.
5. Make sure the gasket on the rear of the unit is
touching the sleeve across the top and down both
sides. This is a rain water seal.
6. Secure the mounting brackets to the unit with
screws provided, #10 hex head sheet metal
screws.
7. Bottom trim extensions are provided for use when
wall is less than 14 inches but greater than 10.5
inches. Secure to wall with screws (not
provided).
8. Attach the bottom trim piece to the unit with the
screws provided (dark colored).
9. Position side trim pieces to wall and attach with
field supplied screws. There are two long pieces
and two short pieces supplied. The long pieces
are to enclose the gap behind the unit. The short
pieces are to fill the gap behind the cabinet
extension or the free blow plenum box. The may
be cut to suit your ceiling height or overlap the
unit side trim. There is sufficient length to trip up
to a 10'2" ceiling.
NOTE: If the exterior wall thickness is between 5
inches to 10.5 inches, a side trim extension
piece kit, model QSTX42, is available.
REMOVE SCREWS FROM
WHEELS BEFORE
ROLLING INTO PLACE
FIGURE 13
REMOVING LOCKING SCREWS FROM WHEELS