


2 7
ƽ WARNING
EXPLOSION
FOR REPLACEMENT PARTS:
• Do not install anything less than a combination temperature-pressure
relief valve certified by a nationally recognized testing lab that maintains
periodic inspection of product of listed equipment or materials, as
meeting the requirements for Relief Valves and Automatic Gas Shutoff
Devices for Hot Water Supply Systems, ANSI Z21.22. This valve must
have a maximum set pressure not to exceed 150 psi.
• Installation must conform with local codes or in the absence of local
codes, American National Standard for Recreational Vehicles, ANSI
A119.2/NFPA 50IC.
• If you use an external electrical source, ground this unit in
accordance with National Electrical Code ANSI/NFPA70. All wiring
must comply with the applicable electrical codes.
• Use electrical metallic tubing, flexible metal conduit, metal clad
cable, or nonmetallic-sheathed cable with grounding conductor.
Wire must have a capacity of 1400 watts or greater. The wiring
method must conform to the applicable sections of article 551 of
the National Electrical Code ANSI/NFPA 70.
ƽ CAUTION
PRODUCT DAMAGE
• Label all wires before disconnecting when servicing controls.
• Verify proper operation after servicing.
• When using Romex
®
with a bare earth ground, take care to position
ground wire so it does not contact the heating element terminals.
OPERATION
1. Check to be sure water completely fills the water heater tank.
2. Locate remote water heater operation switch. (see vehicle owners
manual for location of switch).
3. Turn remote switch to ON.
ƽ CAUTION
PRODUCT FAILURE
• Inspect for leaks.
A leak in the heat exchanger or its connecting line could cause loss of
coolant and subsequent engine failure.
We recommend installer provide a means for by-passing the engine
coolant heat exchanger located on water heater. Frequently inspect
connecting lines and heater to insure that a leak has not developed.
ƽ WARNING
SCALDING INJURY
• Engine coolant circulating through the heat exchanger for more than
two hours will create excessively hot water.
NOTE: The EHP-10 is equipped with a thermostatically controlled high
efficiency heat exchange system which will prevent the water from
becoming excessively hot.
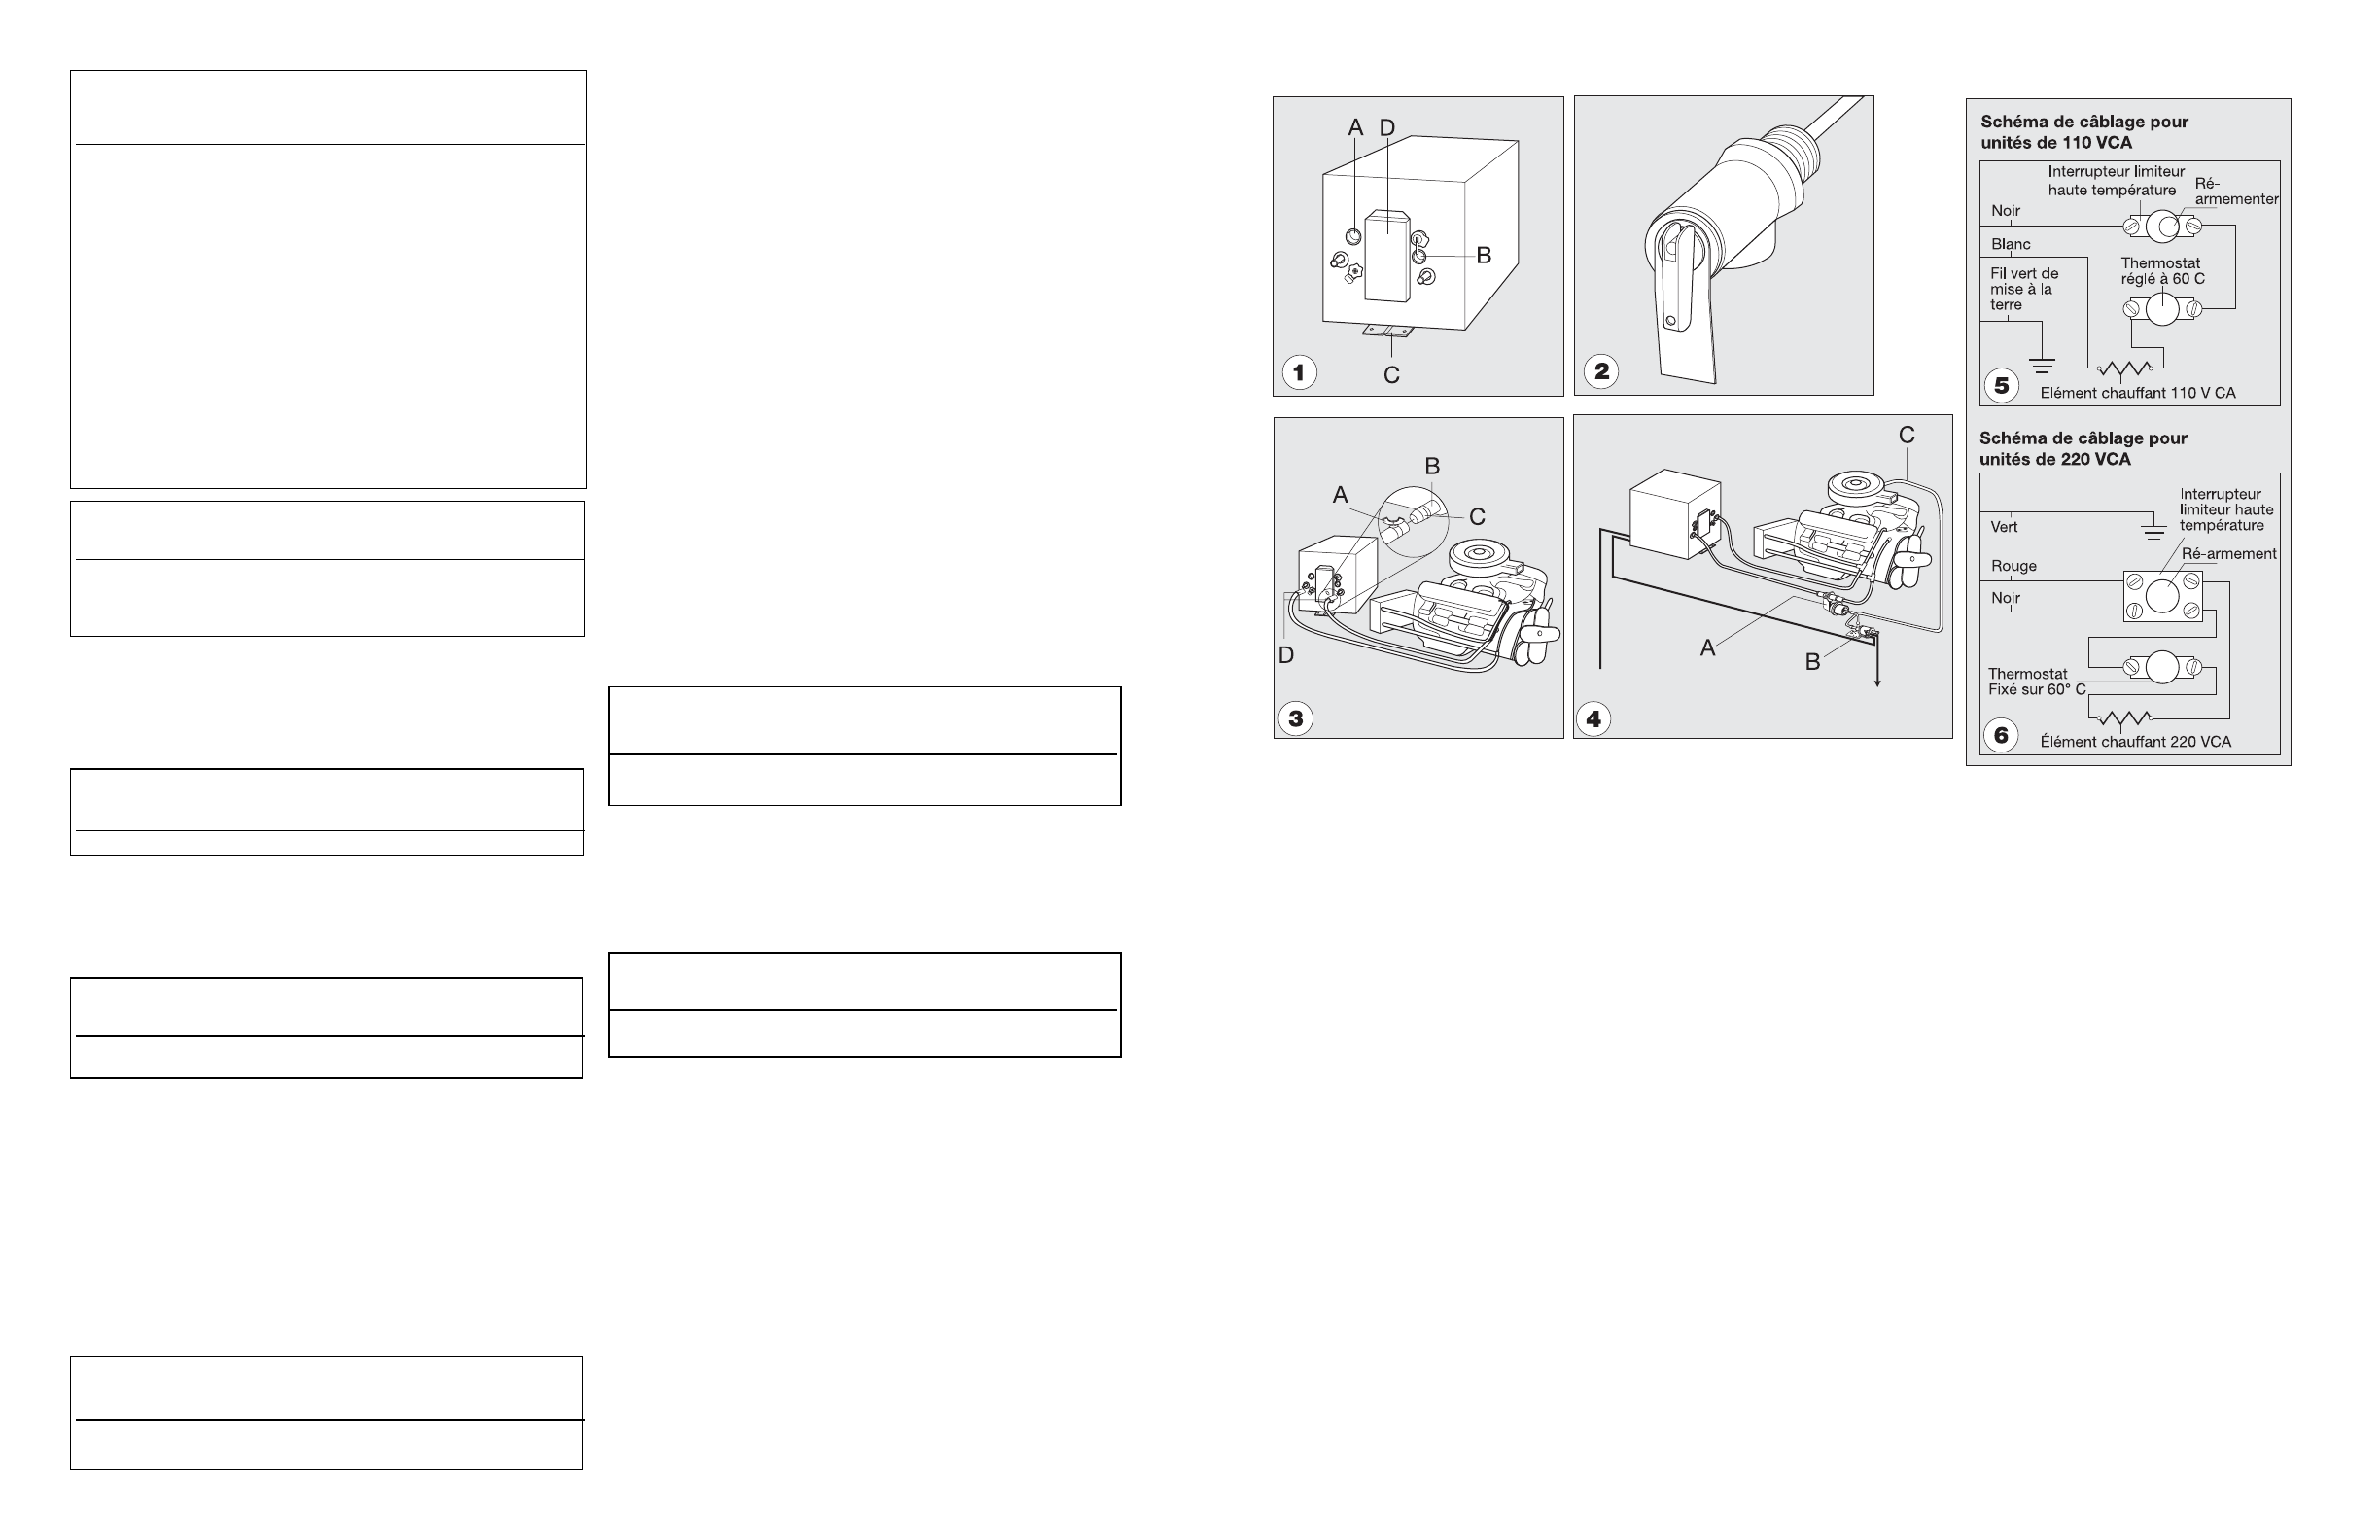
4. This water heater is equipped with a manual reset high-temperature
limit switch. If it should need to reset:
a. Turn the remote switch to the OFF position.
b. Remove the access cover. (see
FIG 1-D)
c. Depress button on the high-temperature limit switch.
d. Replace access cover. Be sure you also replace insulation in cover.
e. If it malfunctions again, contact an authorized Atwood Service
Center or 574-264-2131.
MAINTENANCE
1. Inspect all lines to and from the heat exchanger at regular intervals.
ƽ WARNING
SCALDING INJURY
• Turn off water heater and wait for storage water to cool before
opening the drain plug to flush the tank.
WINTERIZING (FLUSHING) INSTRUCTIONS
To insure the best performance of your water heater and add to the life
of the tank, periodically drain and flush the water heater tank. Before
long term storage or freezing weather drain and flush the tank.
1. Turn off main water supply (the pump or water supply (the pump or
water hook up source).
2. Drain Water Heater Tank by removing the drain plug. If the water
flows sporadically or trickles instead of a steady stream of water, we
recommend the following action; first open the Pressure
Temperature Relief Valve to allow air into the tank and secondly,
take a small gauge wire or coat hanger and poke through the drain
opening to eliminate any obstructions.
3. After draining the tank, because of the placement of the Drain Plug,
approximately two quarts of water will remain in the tank. This water
contains most of the harmful corrosive particles. To remove these
harmful corrosive particles flush the tank with either air or water.
Whether using air or water pressure, it may be applied through the
inlet or outlet on the rear of the tank or the Pressure Temperature
Relief Valve. (If using the Pressure Temperature Relief Valve the
Support Flange must be removed). The pressure will force out the
remaining water and the corrosive particles.
If you use water pressure, pump fresh water into the tank with the
assistance of the on-board pump or use external water for 90
seconds to allow the fresh water to agitate the stagnant water on
the bottom of the tank and force deposits through the drain
opening. Continue repeating adding water and draining until the
particles have been cleared from the water remaining in the tank.
4. Replace the Drain Plug and close the Pressure Temperature Relieve
Valve. the approximately two quarts of water remining in the tank after
draining will not cause damage to the tank should freezing occur.
PRESSURE-TEMPERATURE RELIEF VALVE
ƽ WARNING
EXPLOSION
•
Do not place a valve, plug or reducing coupling on outlet part of
pressure-temperature relief valve.
A Pressure Temperature Relief Valve, dripping while the water heater is
running, DOES NOT mean it is defective. During normal expansion of
water, as it is heated in the closed water system of a recreation
vehicle, the Pressure Temperature Relief Valve will sometimes drip. The
Atwood water heater tank is designed with an internal air gap at the
top of the tank to reduce the possibility of dripping. In time, the
expanding water will absorb this air and it must be restored.
ƽ WARNING
SCALDING INJURY
• Turn off water heater before opening pressure-temperature relief
valve to establish air space. Storage water must be cool.
TO REPLACE THE AIR GAP FOLLOW THESE STEPS:
1. Turn off main water supply (the pump or water hook up source).
2. Let water cool or let run until cool.
3. Open the hot water faucet closest to the water heater.
4. Pull handle of pressure temperature relief valve straight out and
allow water to flow until it stops.
5. Allow pressure temperature relief valve to snap shut; close faucet;
turn on water supply.
6. Turn on water heater and test.
• At least once a year manually operate pressure-temperature relief
valve (
FIG
10
).
When pressure-temperature relief valve discharges again, repeat above
procedure. For a permanent solution, we recommend one of the following:
• Install a pressure relief valve in cold water inlet line to water heater
and attach a drain line from valve to outside of coach. Set to relieve
at 100-125 PSI.
• Install a diaphragm-type expansion tank in cold water inlet line.
Tank should be sized to allow for expansion of approximately 15 oz.
of water and pre-charged to a pressure equal to water supply
pressure. These devices can be obtained from a plumbing contractor
or service center.
(-)
(+)
1. Couper l'alimentation principale en eau (la pompe ou la source
d'apport en eau).
2. Laisser l’eau refroidir ou la laisser couler jusqu’à ce qu’elle soit froide.
3. Ouvrir le robinet d’eau chaude le plus proche du chauffe-eau.
4. Tirer la poignée de la soupape de décharge de type pression-
température vers soi et laisser l'eau couler, jusqu'à ce qu'elle
s'arrête.
5. Laisser la soupape de décharge de type pression-température
revenir brusquement en position fermée ; fermer le robinet ; ouvrir
l'alimentation en eau.
6. Allumer le chauffe-eau et le tester.
• Faire fonctionner manuellement la soupape de décharge de type
pression-température au moins une fois par an (FIG 10).
Lorsque la soupape de décharge de type pression-température
s’écoule à nouveau, répéter la procédure ci-dessus. Pour une solution
permanente, nous vous conseillons l'une des choses suivantes :
• Installer une soupape de décharge de type pression-température
dans la conduite d’arrivée d'eau froide du chauffe-eau et fixer une
conduite d’évacuation sur la vanne extérieure du véhicule. Régler la
limite sur 680 à 850 kPa.
• Installer un réservoir d’expansion de type membrane dans la
conduite d’arrivée d'eau froide. Le réservoir devrait permettre une
dilatation d’environ 426 ml d'eau et une mise sous pression égale à
la pression de l'alimentation en eau. Ces dispositifs sont disponibles
chez un plombier ou dans un centre de service.
RINCER POUR ÉLIMINER LES MAUVAISES ODEURS
Une odeur d’œuf pourri (sulfure d’hydrogène) pourra se dégager du fait
de l’action électrogalvanique du matériau de gainage qui dégage de
l’hydrogène de l’eau. En cas de présence de souffre dans l’alimentation
en eau, l’eau et le souffre se mélangent pour donner une odeur désagréable.
1. Couper l’alimentation principale en eau. Évacuer l’eau du réservoir du
chauffe-eau et réinstaller le bouchon de vidange. Retirer la soupape
de décharge de type pression-température. Préparer une solution de
4 parts de vinaigre blanc pour 2 parts d’eau. Au moyen d’un
entonnoir, verser la solution à l’intérieur du réservoir, avec précaution.
2. Effectuer 4 à 5 cycles du chauffe-eau avec la solution indiquée ci-
dessus en laissant fonctionner normalement.
3. Retirer le bouchon de vidange et évacuer toute l’eau du réservoir.
Rincer le chauffe-eau pour en éliminer tout sédiment. Il est possible de
rincer le réservoir avec de l’air sous pression ou avec de l’eau fraîche.
Appliquer la pression soit sur les clapets d’arrivée ou de sortie à l’arrière
du réservoir, soit au raccord de la soupape de décharge de type
pression-température se trouvant à l’avant de l’unité.
POUR RINCER LE RÉSERVOIR AVEC DE L’AIR SOUS PRESSION :
L’air sous pression devra passer par le raccord de la soupape de
décharge de type pression-température. Le robinet de vidange
ouvert, l’air sous pression forcera l’eau restante à s’écouler de l’unité.
POUR RINCER LE RÉSERVOIR AVEC DE L’EAU SOUS PRESSION :
Il faudra pomper de l’eau fraîche dans le réservoir, soit avec la pompe
transportée à bord, soit avec de l’eau sous pression externe.
Continuer le processus de rinçage pendant environ 5 minutes ; ceci
permet à l’eau fraîche de remuer l'eau stagnante du fond du réservoir
et de pousser les dépôts par l’orifice d’évacuation.
4. Replacer le bouchon de vidange et la soupape de décharge de type
pression-température.
5. Remplir le réservoir avec de l’eau fraîche ne contenant pas de souffre.
Le chauffe-eau Atwood est conçu pour être utilisé dans les véhicules de
plaisance. Si vous utilisez votre véhicule fréquemment ou pour des
périodes prolongées, rincer le chauffe-eau plusieurs fois par an
permettra de prolonger la vie du réservoir d’approvisionnement.