-25-
11. STARTUP PROCEDURE FOR ALL MODELS
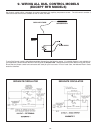
1. PURGE HEAT EXCHANGER: The heat exchanger
should be free of large air pockets to allow the
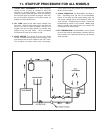
circulator to operate properly. Using the diagram
below as a guide, isolate the boiler return line and flush
the loop until large air pockets are purged. After this,
the air elimination equipment will collect smaller air
bubbles to maximize efficiency.
2. FILL TANK: Open the hot water fixture furthest from
the heater. Open the cold water supply and allow the
water to run until air stops emerging. Until all air is
purged from the hot water system, air pockets may
appear at any hot water fixture. This is considered
normal and will clear as hot water is used.
3. START HEATER: Turn power on to the unit. Smart
Control™ models come pre-set at 120°F for safety. Dial
units should have the knob rotated to the 120°F mark.
The circulator and boiler should start momentarily.
If not, check wiring and consult the troubleshooting
section in this manual.
4. CHECK OPERATION: The BoilerMate
®
will begin to
heat. Depending upon the size of the BoilerMate,
output of the boiler and the space heating load, the
unit should typically reach set temperature within 15
to 60 minutes. If heating does not occur, consult the
troubleshooting section in this manual. Note: Large
heaters coupled with small boilers may exceed this
time period upon initial startup.
5. SET TEMPERATURE: The BoilerMate
®
control should
be set to the minimum temperature consistent with the
user’s needs. This maximizes efficiency and reduces
scald potential.


