


®
791393-100 Rev. A
3
7
5
A
B
8
6
3
4
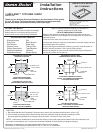
Connect drain assembly hand tight to check alignment. It
may be necessary to cut off part of the tailpiece (area "A")
or part of the horizontal leg of the trap (area "B").
Secure joint for watertight assembly.
2
1
INSTRUCTIONS FOR UNDERCOUNTER MOUNTED SINK
WITH COUNTERTOP MOUNTED FAUCET.
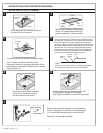
Drill a clearance hole inside the cutout line
as marked on the countertop.
Countertop
Perimeter
of sink
Cutout
Cutout
Countertop
Perimeter
of sink
Cut opening on cut line inside the perimeter of sink.
Note - Formica countertop installation only is illustrated.
Contact your countertop distributor for the best method of
cutting other materials such as marble, hard synthetics, etc.
Cut faucet holes in the countertop and remove the template.
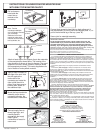
Connect supply lines to faucet finger tight, and
carefully bend to engage with the supply stops.Tighten
connections to faucet for secure seal.
Faucet
Escutcheon
Countertop
CAUTION
PROPER FIT
Prior to beveling the
countertop edge, be sure that
the faucet escutcheon does
not extend onto the curved
portion of the countertop.
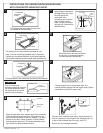
Apply a bead of sealant to
the edge of the sink. Hold
the sink against the
under-side of the
countertop and rotate the
clips to hold the sink in
place. Snug the screws to
hold the sink. Attach all the
additional clips.
Sealant
Cutout
Edge
Countertop
12mm
(1/2")
Support Clip
Single Bowl
Trap
Cutout
Countertop
Template
Attach at least eight of the support clips to the underside
of the countertop as shown below. The location of the
clips should be as shown in the sink diagram. The wood
screws are for use in wood, plywood, or particle board
(drill appropriate pilot hole). The inserts supplied are for
use in marble or hard synthetic material.
CUTOUT
SUPPORT
CLIPS
Sink
Surface
Countertop
Mount the faucet and drain assembly
on the sink or countertop following
the manufacturer's instructions.
Sink
Surface
Countertop