


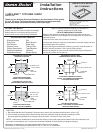

®
791393-100 Rev. A
2
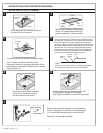
AFTER THE CUTOUT IS DRAWN...
INSTRUCTIONS FOR COUNTERTOP MOUNTING.
1
Perimeter
of sink
Cutout
Drill a clearance hole inside the cutout line
as marked on the countertop.
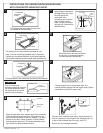
4
1/8"
Masking
tape
outline
Sink
outline
Cutout
Remove sink and apply a masking tape
outline 1/8" outside traced outline as a
guide for application of silicone sealant.
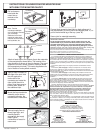
7
Connect drain assembly hand tight to check alignment.
It may be necessary to cut off part of the tailpiece (area
"A") or part of the horizontal leg of the trap (area "B").
Secure joint for watertight assembly.
A
B
Single Bowl
Trap
2
Perimeter
of sink
Cutout
Cut opening on cut line inside the perimeter of sink.
Note - Formica countertop installation only is
illustrated. Contact your countertop distributor for the
best method of cutting other materials such as marble,
hard synthetics, etc.
5
Sink
Masking
Tape
Silicone
Sealant
Apply a generous portion of silicone sealant inside line traced
on countertop. Carefully lower sink into place and press down
firmly. Use guidelines for proper positioning. Using water to
dampen your finger, remove excess sealant for a smooth even
line. Apply additional sealant if necessary to provide a uniform
bead from the rim of sink to the masking tape line as shown.
Carefully remove tape. Dampen finger and run it slightly
over
the sealant to remove any high spots. Use mineral spirits to
remove excess silicone from countertop and sink.
Silicone must be removed within 10 minutes of application
or a permanent residue may remain on the surfaces.
NOTE:
3
Mount the faucet and drain assembly
on the sink or countertop following
the manufacturer's instructions.
6
Connect supply lines to faucet finger tight, and
carefully bend to engage with the supply
stops.Tighten connections to faucet for secure seal.
Sink
Surface
Countertop
Sink
Surface
Countertop