


DISCONNECT
WIRE CONNECTION
6
M965255 REV. 1.6
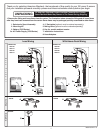
1. Remove the FAUCET COVER (1) by unthreading the
LEVER SCREW (2) and pulling off the LEVER
HANDLE (3). Unthread the FAUCET COVER SCREW
(4) at the back of the FAUCET. Pull FAUCET COVER
(1) up and off. See Fig. 2 in this section.
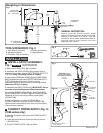
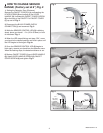
2. Disconnect WIRE CONNECTION (1) to SOLENOID
VALVE (2). Fig. 9.
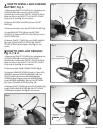
3. Unthread SOLENOID VALVE (2) from VALVE BODY
(3). Fig. 9.
4. Remove FILTER SCREEN (4) from base of
SOLENOID VALVE (2). Rinse clean and replace. Fig. 10.
5. Thread SOLENOID VALVE (2) into VALVE BODY (3)
and hand tighten. Reconnect WIRE CONNECTION (1).
Fig. 9.
6. Replace FAUCET COVER (1) and LEVER HANDLE
(3). Install LEVER HANDLE SCREW (2), FAUCET
COVER SCREW (4) and tighten. See Fig. 2 in this
section.
HOW TO CLEAN FILTER SCREEN
ON SOLENOID VALVE; Fig. 9 & 10
5
1. Remove the FAUCET COVER (1) by unthreading the
LEVER SCREW (2) and pulling off the LEVER
HANDLE (3). Unthread the FAUCET COVER SCREW
(4) at the back of the FAUCET. Pull FAUCET COVER
(1) up and off. See Fig. 2 in this section.
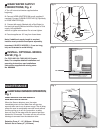
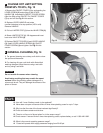
2. Pull out LIMITER STOP (1) from the VALVE STEM
(2). Unthread COLLAR NUT (3) from VALVE BODY (4).
Fig. 11.
3. Pull DIVERTER CARTRIDGE (5) out and replace
with new DIVERTER CARTRIDGE (5).
NOTE: Make sure the two ALIGMENT PINS (6) in the
base of the DIVERTER CARTRIDGE (5) are facing
upward.
4. Replace FAUCET COVER (1) and LEVER HANDLE
(3). Install LEVER HANDLE SCREW (2), FAUCET
COVER SCREW (4) and tighten. See Fig. 2 in this
section.
HOW TO REPLACE DIVERTER
CARTRIDGE; Fig. 11 & 12
6
Fig. 9
1
2
3
Fig. 10
4
2
3
4
2
1
6
Fig. 11
Fig. 12
5
9
8