


2
7301354-100 Rev. B
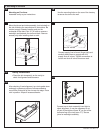
1-E
1-7/8"
ANCHOR SCREW INSTALLATION
Use lag bolts to secure
lavatory as illustrated.
LAG BOLT INSTALLATION
Anchor
Screw
Washer
Lavatory
Nut
Lag
Bolt
Washer
Lavatory
Lavatory
Steel
Hanger
IMPORTANT: Final assembly of nut and washer or lag bolt method shown for reference only.
1-F
A
1-I
Shut-Off
Valves
Rear
View
Pedestal
Screws
1-G
B
C
Install pedestal screws.
Securely tighten lavatory
anchor nuts or lag bolts.
Note: Space constraints
may dictate method of
fastening pedestal to floor.
1. Pedestal installation
1-D
Remove lavatory and
pedestal from installed
position. Drill pilot holes for
lavatory and pedestal
anchor screws or lag bolts.
Note: Some models are supplied with lag bolts, anchor screws,
or steel hangers for lavatory installations only. Other models and
all pedestals are not provided with mounting hardware. Various
pedestal screw sizes and types are available to the installer at
local hardware outlets.
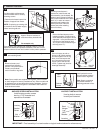
1-A
Provide suitable reinforcement
behind finished wall for lavatory
mounting screws.
*
Determine horizontal center line
location of support from fixture.
NOTE: If replacing an existing sink
be certain to shut off water supply
before removing old sink.
C/L of 2X6
Support
Finished
Floor
*
1-C
Mark lavatory and pedestal screw locations through
the mounting holes.
1-B
Top of Pedestal
For example only
Place lavatory and pedestal into installed position. Level and
square the lavatory and pedestal assembly. Use one or more
bumper cushions to level and cushion lavatory slab to pedestal.
1-H
Secure lavatory to wall as
shown in 1E. Install washers
and hand tighten nuts or lag
bolts. Level and square the
unit. Connect hot and cold
supply lines to the shut-off
valves. Tighten trap joints for
watertight assembly.
Following manufacturer's
instructions, install faucet and
drain assembly (not included). Be
certain to apply a bead of sealing
putty on the underside of the drain
(area "A") in order to ensure a
watertight seal between the
lavatory and drain. Remove
excess putty after installing
drain on lavatory.
Return the fitted lavatory to the
installed position. Connect trap to
drain assembly hand tight to check
alignment. It may be necessary to
cut off part of the tailpiece (area
"B") or part of the horizontal leg of
the trap (area "C").
Approx. Bumper locations to
raise the lavatory slab left side.
Install lavatory anchor screws
leaving 1-7/8" threaded end
exposed as illustrated.