


3
6
Safety
Read Instructions Before Using
When using the dehumidifier, always follow basic precautions, including the following:
• This dehumidifier must be properly installed and grounded as described in this manual.
• Never operate this dehumidifier in an area that is likely to accumulate standing water.
If this condition develops, disconnect the power supply before stepping into the water.
• Repair or replace immediately all electric service cords that have become frayed or
otherwise damaged. Do not use a power cord that shows signs of damage along its length
or either the plug or where it is connected to the appliance.
• Always unplug dehumidifier before servicing or moving the unit.
It is normal for the surrounding air to become slightly warmer as the dehumidifier operates.
This warming effect further reduces the relative humidity of the surrounding air.
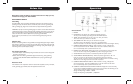
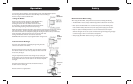
There are 2 ways to remove collected water.
1. Using the Bucket
When the bucket is full, the red indicator light, “BUCKET FULL,”
will go on. You must turn the humidity control off before
removing the bucket. Wait a few minutes to allow the water
to stop dripping. Use both side handles to lift and remove bucket.
Pour water through opening and replace bucket. (See Fig.l )
NOTE: All models are equipped with built-in water overflow control. The unit will shut down when the
water level reaches a maximum level in the bucket. This prevents the bucket from overflowing.
The maximum water level can be adjusted by lifting the red plunger located on the top of the bucket.
Turning the plunger clockwise about two turns will raise the water level.
Turning it anti-clockwise will lower the maximum water level.
WARNING: Make sure the drain cap be tightened before running the unit.
2. Use Continuous Drainage:
The water can be drained out continuously through a long hose that
connects to the bottom of the bucket.
Remove the bucket and remove the plastic cap on the bottom of bucket.
Then take the rubber insert out of the cap (Keep the rubber insert well
for use later). See Fig. #1.
Using the supplied hose, thread the hose through the cap opening and
add the washer to the cap. Screw the cap to the threaded mating connector
on the bucket. Make sure to use the washer or the connection may leak.
See Fig. #2.
Thread the hose through the round hole and extend the hose to
the back of the unit. See Fig. #3.
Place the bucket in its original position.
Fig. #1
Fig. #2
Fig. #3
Using
the Bucket
Using
the Hose
Operation