


4 5
Before Use Operation
Read this manual carefully. It contains instructions to help you use,
maintain and enjoy your dehumidifier.
ELECTRICAL SAFETY
Grounding
This dehumidifier must be grounded. Grounding reduces the risk of electric shock by
providing an escape wire for the electric current. The power cord has a grounding wire
with a grounding plug. Plug it into an outlet that is properly installed and grounded.
WARNING: Improper use of the grounding plug can result in a risk of electric shock. Call
a qualified electrician if you don’t understand the grounding instructions or if you are not
sure if the dehumidifier is properly grounded. If the wall outlet is not grounded, please
contact an electrician to have it replaced with a properly grounded outlet.
Do not, under any circumstances, cut or remove the third (ground) prong from the
power cord.
Adapter Plug
Because most 2-prong outlets are not grounded, we strongly advise against using an adapter
plug. However, a temporary connection may be made where local codes permit and if the
2-prong wall outlet is properly grounded. Make sure the larger prong of the adapter goes
into the large slot to provide proper polarity.
For Proper Grounding
1. Ground the adapter to the outlet by using the outlet cover screw to secure the ground
terminal to the outlet box.
2. Please confirm the outlet is grounded through the house wiring. If the grounding
connector breaks. DO NOT USE the dehumidifier until a proper ground has again
been made.
Extension Cord
If an extension cord is required to reach the nearest wall receptacle, use only a UL-listed,
3-wire, grounding type, 16 AWG, 15A, 125V appliance extension cord.
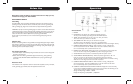
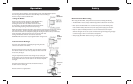
HUMISIDTAT
UP
Button
Control Panel
1. POWER
2. HUMIDISTAT: This allows you to adjust the humidity of the air.
You may set the humidity by pressing the UP and DOWN buttons.
3. TIMER: Your dehumidifier can be set to go on or off at your desire.
This can be done up to 24 hours in advance.
4. TWO-SPEED FAN: When this you can control the fan speed.
You have 2 levels of Fan Speed for you to set at you desired level.
LOW will circulate air at the lower velocity and HIGH will circulate at the higher velocity.
5. CURRENT TEMP/TIMER SET DISPLAY: When machine is running, it displays the
current temperature. Press the “TIMER” button to set the machine to shut off or
turn on automatically after a specified amount of time.
6. BUCKET FULL INDICATOR: When light comes on, automatic flow control stops the
unit. Turn the unit off by pressing “POWER” key before emptying the bucket.
7. AUTO RESTART: Turns the unit on automatically when the power returns
8. AUTO-DEFROST SENSOR (BUILT-IN): When temperature gets down to 60° F or
lower, ice may form on the evaporator coils preventing removal of moisture.
The IC stops the compressor when this happens but allows the fan to continue running.
When the ice is no longer present it starts the compressor.
9. CURRENT TEMP/TIMER SET DISPLAY: When machine is running, it displays the
current temperature. Press the “TIMER” button to set the machine to shut off or
turn on automatically after a specified amount of time.
10. CURRENT HUMIDITY/SETTING HUMIDITY DISPLAY: Displays the current humidity.
If you press the “ADJUST HUMIDITY” button, the screen will show the humidity you set
and be back to show the ambient humidity 5 seconds later.
Setting Humidity Range: 40%RH ~ 70%RH
Display Humidity Range: (LO)30%RH ~ (HI)90%RH