


American-Lincoln 1 - 27
91 WS
FLAP SERVICE INSTRUCTIONS
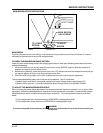
The flaps are very important to the sweeping process. Inspect the flaps daily and replace any flap that shows
signs of wear or deterioration. The side flaps are adjustable and should be adjusted so there is a recommended
1/16" to 1/8" gap between the floor and the bottom edge of the flaps. The adjustable flaps have slotted mounting
holes to facilitate adjustment. The recycling flap is also adjustable and should be adjusted so the flap touches
the broom. All other flaps require no adjustment and should be replaced when worn or damaged.
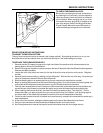
TO ADJUST THE SIDE FLAPS
1. Park machine on a smooth level surface. Turn the key switch to the “OFF” position.
2. Loosen the flap retaining screws and adjust the flap to clear the floor and leave a 1/16" to 1/8" gap.
3. Tighten flap retaining screws while holding flap in position.
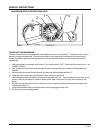
HOPPER SERVICE INSTRUCTIONS
The hopper houses the debris compartment, the dust control filter and the removable dust baffle. For maximum
performance and service life, keep the hopper clean and inspect the seals and flaps daily. Clean the hopper prior
to parking the sweeper at the end of the day. A clean hopper will make inspecting the flaps and seals much
easier and will prevent premature deterioration of hopper components. Do not leave the hopper full of debris while
in storage or when parked for extended periods of time.
TO CLEAN HOPPER
Once the hopper has been emptied, the insides of the hopper should be rinsed out with water and allowed to dry
completely.
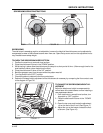
TO CHECK HOPPER SEALS
The hopper seals are important to positive dust control while sweeping. Damaged seals will reduce vacuum
pressure at the broom. Inspect for cuts, tears and proper positioning of the seal material. Replace all seals that
become damaged.
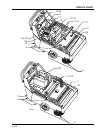
BATTERY SERVICE INSTRUCTIONS (Battery powered machine only)
Install the batteries as shown on page 7 and make sure all connections are wrench tight. A film of Vaseline will
help prevent corrosion at the battery connection. Do not replace the electrolyte in the batteries if they have been
in service for more than a week.
Charge the batteries when the battery condition
meter stays in the red zone while the machine is
being operated.
Read the safety precautions and follow the instruc-
tions for charging the batteries on page 18.
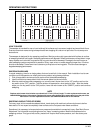
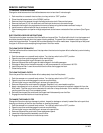
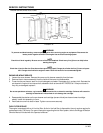
Check the liquid level in the batteries weekly. The
liquid level must be checked after the batteries have
been charged since the level may rise during the
charging cycle.. Add distilled water to bring the level
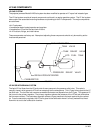
up to a 1/4" below the fill tube as shown in Figure 18.
DISTILLED WATER
FILL TO 1/4 INCH
FROM BOTTOM OF TUBE
1/4 INCH (6mm)
P4074 FIGURE 18
SERVICE INSTRUCTIONS