


1-18 American-Lincoln
91 WS
TO CHARGE THE MOTIVE POWER BATTERIES (Battery powered machines only)
1. Read the detailed instructions provided on the charger.
2. Be sure all controls are “OFF” and machine is located in an area with good ventilation.
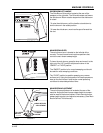
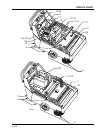
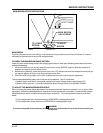
3. Open the top cover. The top cover must remain open during the charging process.
4. Disconnect the machine power supply cable from the battery using thequick disconnect provided.
5. Connect the charger cable to the battery connector.
6. Plug the charger into properly grounded AC outlet. Be sure to verify theoperating voltage of your charger. The
chargers supplied with machine operate at 115 VAC @60 HZ or 230 VAC @ 50 HZ.
7. The charger will begin charging the batteries after a short period of time. The charger will shut off automati
cally when the charging process is complete.
8. Unplug the charger from the grounded AC outlet before disconnecting the charger from the battery.
9. Disconnect the charger cable from the battery.
10. Check the electrolyte level in the battery after charging. Add distilled water if needed.
11. Reconnect the machine power supply cable to the battery cable.
12. Lower the top cover and perform the pre-start checks before operating the machine.
GASOLINE POWERED MACHINE FUELING INSTRUCTIONS
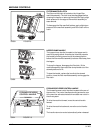
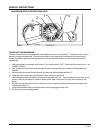
The fuel tank for gasoline powered machines is located on the engine. The top cover must be opened to access
the fuel tank. After opening the top cover, observe the combination fuel cap/gas gauge and check the fuel level to
determine if the fuel tank needs to be filled.
TO FILL THE GASOLINE POWERED MACHINE FUEL TANK
WARNING
To prevent possible fire. Never fill fuel tank while the engine is running. Always be sure gasoline container and
sweeper are electrically grounded before dispensing gas. This can be done by permanently attaching an insulated
wire with a battery clip on the end to the gasoline container.
1. Turn the key switch to the “OFF” position.
2. Open the top cover.
3. Observe the level indicated by the gas gauge on the fuel tank cap.
4. Remove the fuel tank cap from the fuel tank and add gasoline as needed.
5. Install the gas cap and lower the hinged top cover.
LP POWERED MACHINE FUELING INSTRUCTIONS
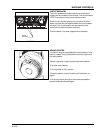
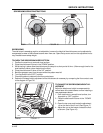
Fueling the LP powered machine is accomplished by removing the empty LP cylinder and replacing it with a full
replacement cylinder. Some cylinders are equipped with a fuel level gauge. Check the gauge and change the
cylinder when the gauge reads “EMPTY”. See the LP Instructions in this manual for additional information.
WARNING
Improper filling procedures could cause an explosion. Have your LP cylinders filled by qualified personnel.
WARNING
Park the machine in a safe area designated for changing LP fuel tanks. The designated safe area must have
adequate ventilation, must be free from sparks or other sources of ignition.
WARNING
NO SMOKING signs should be posted and enforced. The area must not be in the vicinity of flammables, combustible
materials or high temperature sources such as furnaces or ovens.
WARNING
Always store and transport LP fuel tanks with the safety relief valve in the up position. This will prevent the tank
from venting liquid propane in the event the safety relief valve opens due to overpressure in the tank. A properly
stored tank will only vent gaseous propane which dissipates much faster than liquid propane.
OPERATING INSTRUCTIONS