


1110
Fully Bonded System – Solid wood and
engineered boards can be fully bonded on
to flat and level screeds (see Substrates,
page 8). It is imperative however that the
screed is sufficiently dry. If the screed has a
relative humidity reading of over 60%, a
wood floor must not be laid over it without
the application of a surface damp proof
membrane such as Sika Primer MB. Follow
the manufacturer’s instructions rigidly to
ensure the membrane is fully effective.
Fired Earth recommends that at least one
coat of Sika Primer MB is applied to a
screed even if the screed is believed to be
60% RH or below.
CLIP SYSTEM – Boards being laid using the
CLIP SYSTEM should be fitted directly onto
the polythene membrane which has been
overlaid with Fired Earth Wood Underlay.
b. Engineered Boards
The subfloor should be level prior to
installation of a wood floor. Fired Earth
Universal Levelling Compound can be
used on screeded floors up to a maximum
depth of 5mm to level the substrate
when necessary.
Fired Earth Wood Underlay should be fitted to
cushion the floor after laying a suitable
polythene 250mu sheet (Visqueen) to provide
a DPM. Lay the Fired Earth Wood Underlay
so joins run in the opposite direction to
the timber floor.
Existing Timber Base
A new wood floor should be laid at a 90
degree angle to the existing boards. If the
new boards are to be laid in the same
direction as the old, plywood sheets
(minimum depth 6mm) should be nailed or
screwed to cover the existing floor, allowing
a 15mm perimeter gap for expansion. Loose
boards etc. should be firmly fixed to reduce
the risk of squeaking in the new floor.
a. Solid Boards
When laying suitable new wood boards
directly onto existing joists, noggins may be
required to support the end joins.
Suspended ground floors must have
sufficient cross ventilation to prevent
condensation occurring on the underside of
the flooring. It is advisable to lay a suitable
membrane over the joists to help protect
the undersides of the new boards from
moisture. Fix the boards by secret nailing.
b. Engineered Boards and Solid Wood
using the CLIP SYSTEM (128MM WIDE
SOLID WOOD BOARDS ONLY).
The subfloor must be flat to ensure the
boards are fully supported. Use WBP plywood
of a suitable depth to level the floor prior to
fitting the underlay and wood if required.
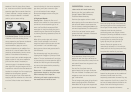
Sound and Impact Reductions
In order to reduce sound impact noise in
solid wood floors when fitting onto
concrete floors, Sika AcouBond system can
be used. The synthetic foam mat is laid
onto the subfloor. Sika T52 adhesive is then
applied into the preset channels within the
underlay. This system also ensures that a
high bond strength is achieved and is
slightly ‘forgiving’ in uneven subfloors.
Stage 2 - Installation
Setting out
Allow ample time to study the room and to
plan your work. After consultation between
client and fitter and selection of a starting
point, mark out a straight line parallel to
the chosen wall, allowing a 15mm gap for
expansion. Check for straightness with
other walls and in adjoining rooms if the
boards are to continue into them. It may be
necessary to scribe the first row of boards
to achieve correct alignment throughout
the area(s) to be fitted. All end joints should
have a minimum overlap of 300mm from
the board ends on either side, and be
staggered throughout the floor to achieve
a random effect and strength particularly
when fitted onto battens or joists.
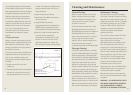
a. Solid Boards
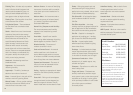
Secret Nailing - Square the first run of
boards to the marked line and top nail and
countersink through the boards as near to
the wall as possible (see diagram below).
Top nail at 25-30cm intervals or onto every
joist, and where possible within 7.5cm of
the end of each board. Care must be taken
with presealed boards, not to damage the
surface. Remember to thoroughly mix
boards for colour, texture, grain, width etc.
as the floor is fitted.
Using the same spacing of 25-30cm, secret
nail at 45 degrees and countersink through
the tongue, it will not be possible to use
the Porta Nailer on the first and possibly
second row of boards, nearest to the
starting and finishing walls. Therefore a
pilot hole should be drilled and nails
hammered home and countersunk).
Fit the next run of boards groove to tongue
and secret nail. Continue to fit the boards
from left to right remembering to stagger
the joints by a minimum of 300mm. Trim
the last boards to fit, allowing 15mm for
expansion, use offcuts to start the next
row of boards where possible. Check the
straightness of your work as you progress.
Top nail and countersink the last run of
15mm expansion gap
Secret nail
Top nail countersunk
Skirting