


1 Before You Start
n Make sure that you have the following items ready for the installation:
n 3Com Access Point 8250, 8500, or 8750
n Standard detachable antennas (Access Point 8250 or 8750)
n 3Com installation CD
n Ethernet category 5 straight cables (8-wire)
n For wall-mount installations you will need the following items:
Mounting plate
Mounting screws
Plastic anchors for drywall mounting
n 3Com Integrated Power-over-Ethernet power supply and power cord
n To use the Web configuration management system, you need a computer running one of the
following operating systems and one of the following browsers:
n Operating Systems: Windows 98, Windows ME, Windows NT 4.0 (with the latest
service pack), Windows 2000, or Windows XP.
n Browsers: Internet Explorer 5.0 or later. (Internet Explorer 5.5 is available on the
installation CD.)
2 Prepare for Installation
It is advisable to connect the power and check the Ethernet cables and LEDs before installing the unit in a hard-
to-reach location.
1 Observe the following power requirements:
The access point complies with the IEEE 802.3af power-over-Ethernet standard. It receives
power over category 5 straight cable. Installation requires the use of either the 3Com power
supply provided or IEEE 802.3af compliant power supply equipment (output power rated
48 V DC @ 350 mA maximum). Such equipment must be safety certified according to UL,
CSA, IEC or other applicable national or international safety requirements for the country of
use. All references to the power supply refer to equipment that meets these requirements.
Because the power supply plug is the only means of disconnecting the access point from
power, make sure the power outlet is accessible.
The power supply can be located indoors at any point between the access point and the LAN
access port where an accessible power outlet exists.
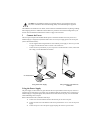
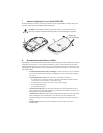
2 Decide where to place the access point.
n Mounted on a wall on a stud (or other hard surface)
n Mounted on to drywall
n Placed on a flat surface
The location should be elevated and centrally located relative to users on your network. Ceiling mounting is not
recommended.
3 Record the access point MAC address in a safe place before the access point is installed in a
hard-to-reach location. The MAC address is printed on the back of the access point housing.
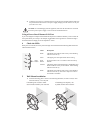
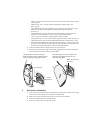
4 Access Point 8250 or 8750: Carefully unpack the standard detachable antennas. Screw the
antennas on to the SMA connectors and hand-tighten them. After network startup, you may
need to adjust the antennas to fine-tune coverage in your area.
NOTE: Regulatory restrictions dictate that when the access point is operational a minimum body-
to-antenna distance of 1 meter (3 feet) must be maintained.