40 EN
MasterPage: Heading0_Left
EDITING
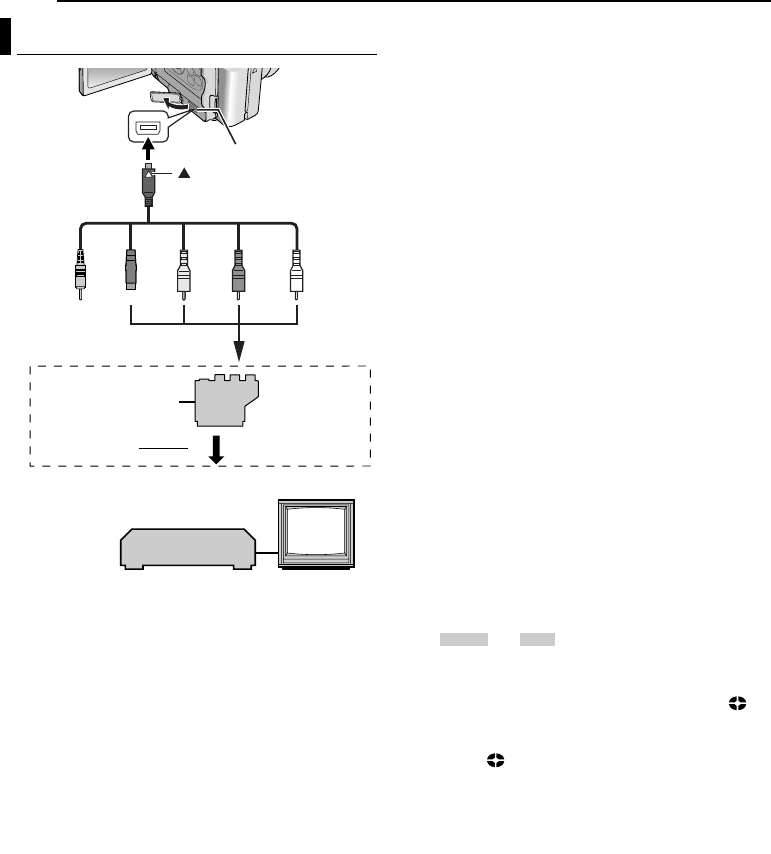
A Remote plug: Not connected (When not in use, keep
the Remote plug in its protective caddy.)
B To S-VIDEO IN or OUT**
C Yellow to VIDEO IN or OUT
D Red to AUDIO R IN or OUT
E White to AUDIO L IN or OUT
* If your VCR has a SCART connector, use the provided
cable adapter. (The provided cable adapter accepts only
output signals from this camcorder. To use this camcorder
as a recorder, use a commercially available cable
adapter.)
** Connect when your TV/VCR has an S-VIDEO IN/OUT
connector. In this case, it is not necessary to connect the
yellow video cable.
NOTE:
Set the video out select switch of the cable adapter as
required:
Y/C: When connecting to a TV or VCR which accepts Y/
C signals and uses an S-Video cable.
CVBS: When connecting to a TV or VCR which does not
accept Y/C signals and uses an audio/video cable.
To use this camcorder as a player
1 Following the illustrations, connect the camcorder and
the VCR’s input connectors.
2 Start playback on the camcorder. (੬ pg. 19)
3 At the point you want to start dubbing, start recording
on the VCR. (Refer to the VCR’s instruction manual.)
4 To stop dubbing, stop recording on the VCR, then stop
playback on the camcorder.
NOTES:
● It is recommended to use the AC Adapter as the power
supply instead of the battery pack. (੬ pg. 13)
● To choose whether or not the following displays appear on
the connected TV
•Date/time
Set “DATE/TIME” to “AUTO”, “ON” or “OFF”.
(੬ pg. 29, 33) Or, press DISPLAY on the remote control
to turn on/off the date indication.
•Time code
Set “TIME CODE” to “OFF” or “ON”. (੬ pg. 29, 33)
•Indications other than date/time and time code
Set “ON SCREEN” to “OFF”, “LCD” or “LCD/TV”.
(੬ pg. 29, 33)
To use this camcorder as a recorder
1 Following the illustrations, connect the camcorder and
the VCR’s output connectors.
2 Set “REC MODE” to “SP” or “LP”. (੬ pg. 29)
3 Set the camcorder’s Power Switch to “PLAY”.
4 Set “S/AV INPUT” to “A/V.IN” or “S.IN”*.
(੬ pg. 29, 32)
* Select “S.IN” when using S-VIDEO OUT connector on your
TV/VCR.
5 Press the Recording Start/Stop Button to engage the
Record-Pause mode.
● The “ ” or “ ” indication appears on the screen.
6 Start playback on the player.
7 At the point you want to start dubbing, press the
Recording Start/Stop Button to start dubbing. The
indication rotates.
8 Press the Recording Start/Stop Button again to stop
dubbing. The indication stops rotating.
9 Press 8 to return to the normal playback mode.
NOTES:
● After dubbing, set “S/AV INPUT” back to “OFF”.
● Analogue signals can be converted to digital signals with
this procedure.
● It is also possible to dub from another camcorder.
Dubbing To Or From A VCR
123 4 5
TV
VCR
Open the cover.
To S/AV
connector
S/AV/Editing cable
(provided)
mark
To VCR
“Y/C”/“CVBS” Video
Out Select Switch
Cable Adapter*
A/V
.
IN S
.
IN
GR-DZ9_DZ7PAL_07Advanced.fm Page 40 Thursday, May 27, 2004 6:57 PM


