Manual Setting in Menu
In the manual recording mode;
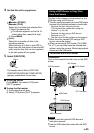
1 Press MENU.
2 Select [MANUAL SETTING].
VIDEO QUALITY
ZOOM
DIS
MANUAL SETTING
SET MANUAL RECORDING
SET QUIT
Manual Recording (Continued)
3 Select the desired menu.
SHUTTER SPEED
APERTURE PRIORITY
WB
ADJUST BRIGHTNESS
ADJUST SHUTTER SPEED
MANUAL SETTING
RETURN
SET QUIT
4 Select the desired setting.
SHUTTER SPEED
APERTURE PRIORITY
WB
ADJUST BRIGHTNESS
MANUAL SETTING
RETURN
SET QUIT
AUTO
MANUAL
To return to the previous screen
Move the set lever to £.
To quit the screen
Press MENU.
Menus Settings: [ ] = Factory-preset
g ADJUST BRIGHTNESS
Adjusts the brightness.
! mode
@
[AUTO]
: The brightness is adjusted automatically.
–6 to +6
: Corrects the brightness within this range in increments
of 1. Move the set lever to ¡ / ¢ to set the value.
# mode
@
[AUTO]
: The brightness is adjusted automatically.
–2.0 to +2.0 (EV)
: Corrects the brightness within this range in
increments of 1/3EV. Move the set lever to ¡ / ¢ to set the
value.
To lock the exposure
After you finish configuring the setting, press and hold the
set lever for more than 2 seconds. The
C indicator appears.
9
SHUTTER SPEED
A fast shutter speed can freeze
the motion of a fast-moving
subject, and a slow shutter
speed can blur the subject to
give the impression of motion.
@
[AUTO]
: The shutter speed is adjusted automatically.
! mode: 1/2 to 1/4000
# mode: 1/2 to 1/500
The smaller the value, the faster the shutter speed. Move the
set lever to ¡ / ¢ to set the value.
NOTE
It is recommended to use a tripod (Z p. 20) when recording with a
slow shutter speed.