If you want to lock the battery drawer, or lock the Smoke Alarm to
t
he mounting bracket, please read the “Optional Locking Features”
s
ection before you begin installation.
1
. Hold base firmly and twist the mounting bracket clockwise to separate
i
t from the base.
2
. Hold the mounting bracket against the
c
eiling (or wall) so the two clusters of
universal mounting holes are aligned
approximately at the 9:00 and 3:00 o'clock
p
ositions. See image. Choose one of the
t
hree sets of holes shown, A, B or C (see
image) and trace around one of the sets.
Be sure to choose a top and bottom slot
o
n opposite sides so you can rotate the
U
niversal Mounting Bracket into position
later. This will make it easier in the future
the remove the mounting bracket without
c
ompletely removing the screws.
W
ARNING! Do not install this Smoke Alarm over an existing
electrical box. Only AC power
ed units are intended for installation
over electrical boxes.
3. Put the unit where it won’t get covered with dust when you drill the
mounting holes.
4
. Using a 3/16” (5 mm) drill bit, drill a hole thro
ugh the center of the
o
val outlines you traced.
5. Insert the plastic screw anchors (in the plastic bag with screws) into
the holes. Tap the screw anchors gently with a hammer, if necessary,
until they are
flush with the ceiling or wall.
6. Install the screws but do not tighten completely. Attach the mounting
bracket by aligning the screws in the open portion of the universal
mounting slots and rotating the bracket into place. Tighten the screws
until they are snug to secure the bracket. Do not over tighten.
7.
Install the batteries (included) so the terminals on the battery match
the terminals on the Smoke Alarm. Match “+” to “+” and “-” to “-.”
Push the batteries in until they snap in securely and cannot be shaken
loose. If the batteries are not in completely, the unit cannot receive
battery power.
NOTE: After you install the batteries, the power indicator light will
flash and the horn will chirp. (If the unit alarms, the light will blink
rapidly, and the horn will repeatedly sound 3 beeps, pause, 3 beeps.)
8. Attach the Smoke Alarm to the bracket. Line up the guides on the
alarm’s base with the guides on the mounting bracket. When guides
are lined up, turn the base clockwise (right).
NOTE: Once the Smoke Alarm is on the bracket, you can rotate
the Alarm to adjust the alignment.
9. Test the Smoke Alarm. See “Weekly Testing.”
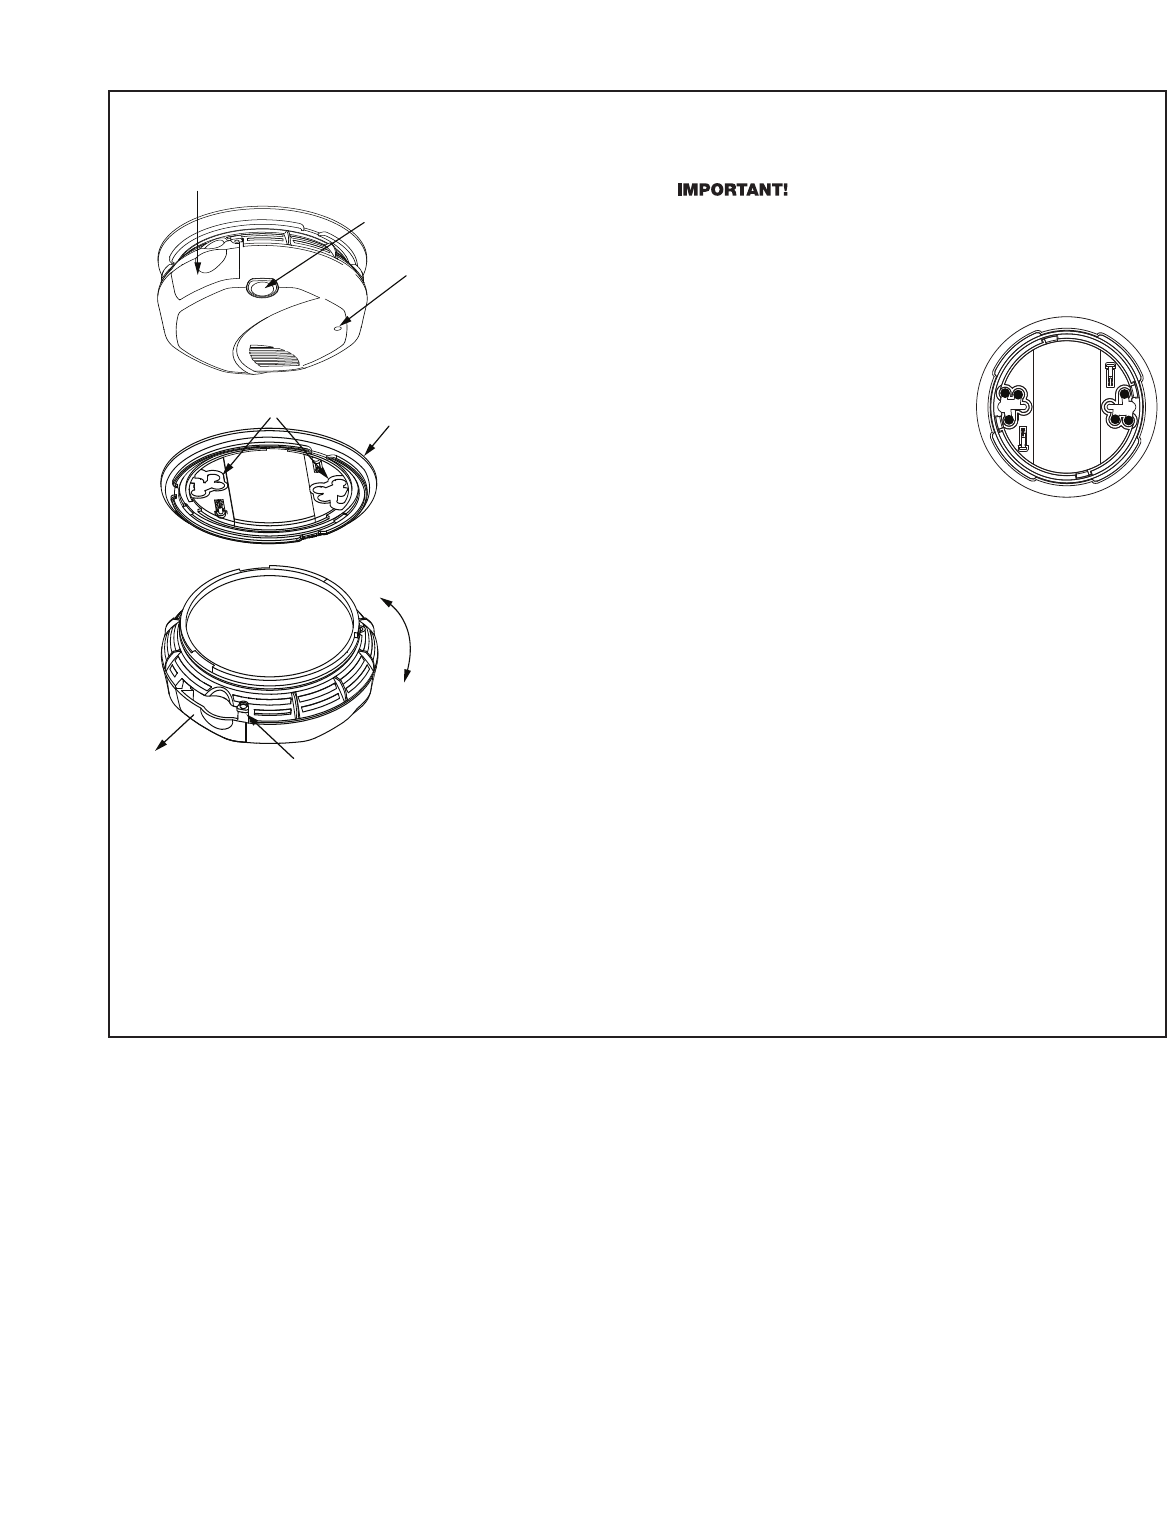
1
. Mounting bracket
2. Universal Mounting
Holes
3
. Battery Drawer Lock
P
in Hole
4. Slide-open battery
drawer
5. Turn this way to remove
from bracket
6. Turn this way to attach
t
o bracket
1
. Test/Silence button
2
. Slide-open battery
drawer
3
. Multi-color Indicator
L
ight (Red or Green)
HOW TO INSTALL THIS SMOKE ALARM
THE PARTS OF THIS SMOKE ALARM
FOLLOW THESE SIMPLE STEPS!
TOOLS YOU WILL NEED:
This unit is designed to be mounted
on the ceiling, or on the wall if necessary.
• Pencil
• Drill with 3/16” (5 mm) drill bit
• Standard flathead screwdriver
• Hammer
• Pliers or utility knife, to activate optional
“tamper-resistant” locking features
2


