4
3 Running Express Setup
When you first set up the switch, you should use Express Setup to enter the initial IP information.
Doing this enables the switch to connect to local routers and the Internet. You can then access the
switch through the IP address for further configuration.
You need this equipment to set up the switch:
• A PC with Windows 2000 or XP installed.
• A web browser (Internet Explorer 5.5, 6.0, Netscape 7.1 or later) with JavaScript enabled.
• A straight-through or crossover Category 5 Ethernet cable to connect your PC to the switch.
Disable any pop-up blockers or proxy settings in your browser software and any wireless client
running on your PC.
To run Express Setup:
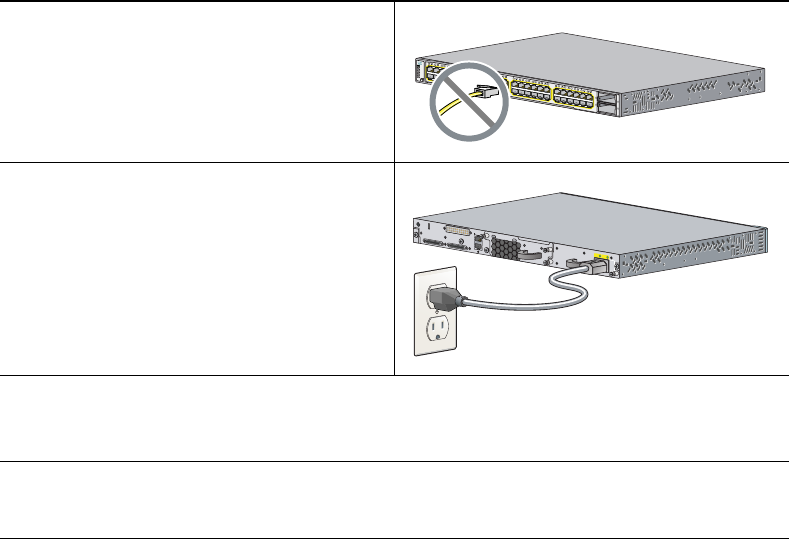
Step 1
Make sure that nothing is connected to the
switch.
During Express Setup, the switch acts as a
DHCP server. If your PC has a static IP
address, change your PC settings before you
begin to temporarily use DHCP.
Step 2
Power the switch.
For AC-powered switches, connect the AC
power cord to the switch power supply and
to a grounded AC outlet.
For DC-powered switches, see the wiring
instructions in the hardware installation
guide on Cisco.com.
Step 3
When the switch powers on, it begins the power-on self-test (POST). During POST, the
LEDs blink while tests verify that the switch functions properly.
Wait for the switch to complete POST, which can take several minutes.
Step 4
Verify that POST has completed by confirming that the SYST LED remains green. If the
switch fails POST, the SYST LED turns amber. See the “In Case of Difficulty” section on
page 22 if your switch fails POST.
M
O
D
E
S
Y
S
T
R
P
S
M
A
S
T
R
S
T
A
T
D
U
P
L
X
S
P
E
E
D
P
o
E
S
T
A
C
K
4
9
5
1
X
2
-
1
X
2
-
2
5
0
5
2
37
38
399
40
41
42
43
44
45
46
47
48
3
7
X
4
7
X
3
8
X
4
8
X
25
26
27
28
29
30
31
32
33
34
35
36
2
5
X
3
5
X
2
6
X
3
6
X
13
14
15
16
17
18
19
20
21
22
23
24
1
3
X
2
3
X
1
4
X
2
4
X
1
2
3
4
5
6
7
8
9
10
11
12
1
X
1
1
X
2
X
1
2
X
C
a
t
a
l
y
s
t
3
7
5
0
-
E
S
E
R
IE
S
Po
E
-4
8
A
C
O
K
P
S
O
K
100-240V
~
1.0-5A
50-60 HZ


