


OPERATIONS
QTFSG/QTFSD 98349 05/15/03
3-8
STOPPING THE MACHINE
1. Remove foot from the directional pedal and
apply the brake.
2. Raise and turn off the brooms by pulling the
main and side broom levers back to the rear
locked position.
3. Set the parking brake.
4. Turn the key switch counterclockwise to the off
position. Remove the key.
STORING THE MACHINE
When storing the machine for extended periods of
time, the following procedure must be followed to
lessen the chance of rust, sludge, or other
undesirable deposits from forming.
1. Empty the hopper.
2. Raise the main broom and the side broom.
3. Park the machine in a cool, dry area.
4. Remove or change the batteries for 4 hours,
once every three months.
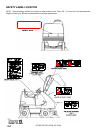
DUMPING THE HOPPER
NOTE: The hopper dump switches are numbered
and color-coded. The filter shaker is shown in
yellow and hopper functions are shown in red.
1. Drive the machine to the dump site or dumpster.
2. The correct sequence for dumping the hopper is
shown by following the numbers on the switch
panel.
1. Clean the filter by pressing the filter shaker
switch for 10-20 seconds.
2. Close the hopper door by pushing and
releasing the front half of the hopper door
switch. The beeper will sound.
3. Press and hold the front half of the hopper
lift switch and raise the hopper to a height
that will clear the dumpster, then release the
switch. Drive forward slowly until the hopper
is positioned above the dumpster.
4. Dump the hopper by pressing and then
releasing the rear half of the hopper door
switch. After dumping, back the machine
slowly away from the dumpster.
5. Lower the hopper by pressing and holding
the rear half of the hopper lift switch.
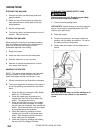
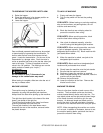
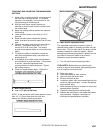
TO ENGAGE THE HOPPER SAFETY ARM
Raised hopper may fail. Engage hopper safety
arm before working under hopper.
1. Set the machine parking brake.
FOR SAFETY: Before leaving or servicing machine;
stop on level surface, set parking brake, turn OFF
machine and remove key.
2. Raise the hopper.
3. Unhook the safety arm and swing it down into
position over the safety arm retainer. Do not let
the safety arm drop into position.
4. Slowly lower the hopper until the safety arm is
secure.
Make sure that the lower end of the safety arm is
correctly held in the retainer on the machine
frame.