Installation
6
7
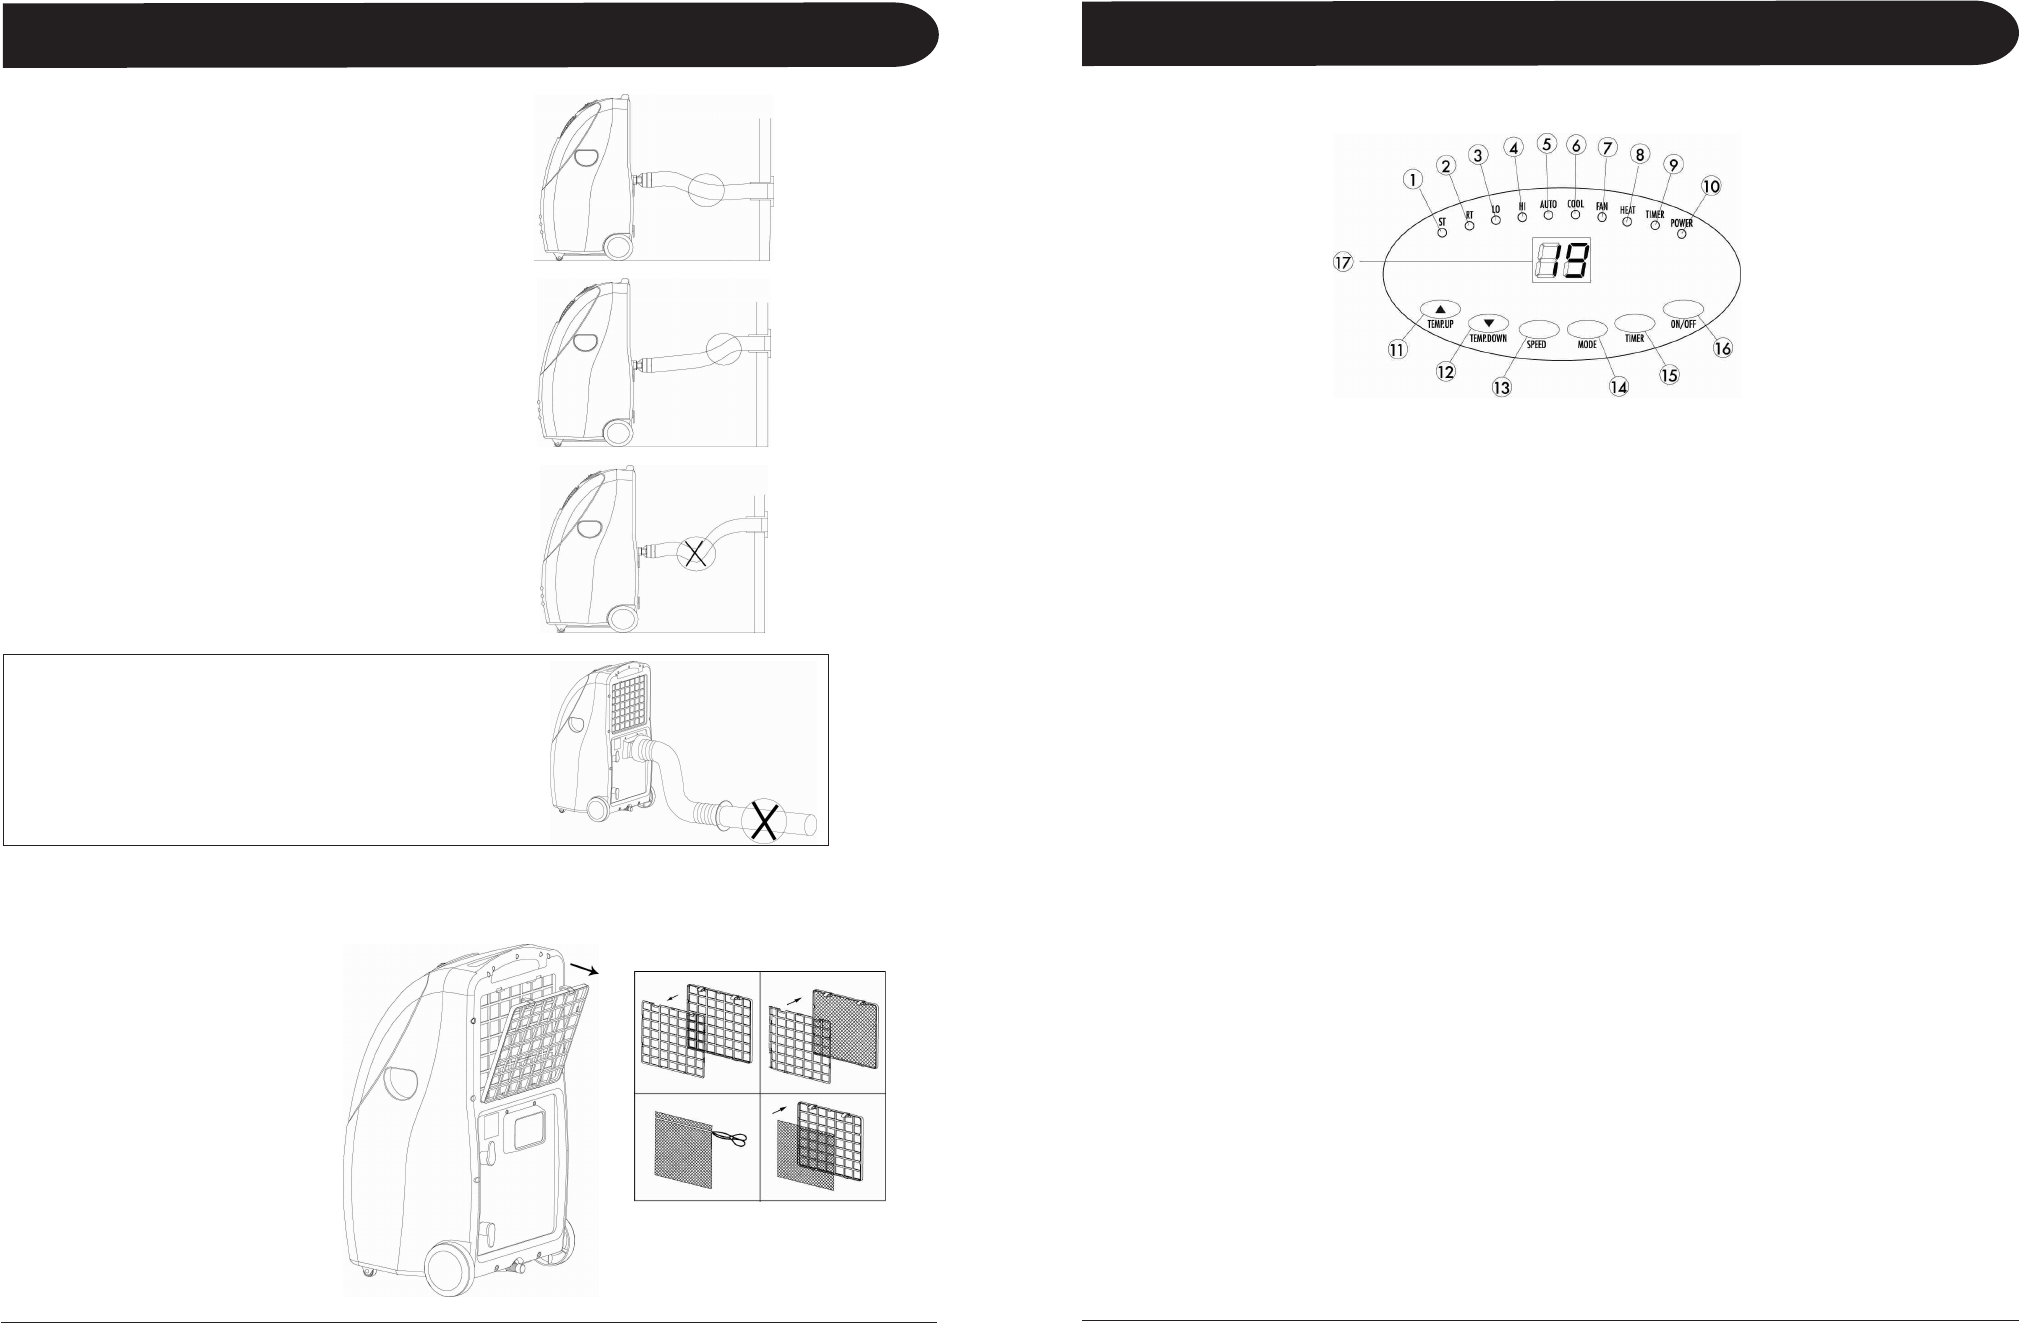
Control Panel
1. Set temperature indicator
2. Room temperature indicator
3. Low fan speed indicator
4. High fan speed indicator
5. Automatic mode indicator
6. Cooling mode indicator
7. Fan mode indicator
8. Heating mode indicator
(for models with heating options)
Mounting the exhaust pipe
• The supplied exhaust hose can be
extended from 1 foot to 5 feet
for mounting. It is recommended that
you use the shortest possible length of hose.
• Take care to prevent any kink or
bend in the middle of the exhaust
hose, as this will trap hot exhaust air,
which will radiate back into the room.
Installation of the Carbon Filter
Setting Mode/Function
Press the MODE button to select the required working mode: Automatic, Cooling, Fan or Heating (Heating is only
available for ARC-12H). The green indicator illustrating your selected mode lights up. It is recommended to select
Cooling or Heating mode and set your desired temperature, as the Auto mode has a preset temperature (please
see below) that cannot be changed.
The indicators of the functions in progress come on at the same time, e.g. Cool and Lo = Cooling mode with Low fan speed.
Auto Mode
When this mode is selected, the unit is preset to the following temperature settings and unit will only start to:
• Cool when room temperature is higher than 75ºF
• Heat when room temperature is lower than 68ºF (ARC-12H only)
If room temperature is between 68ºF and 75ºF, unit will stay in Fan mode. Again, when in Auto Mode, the temperature
settings cannot be changed.
Setting the Temperature in Cooling or Heating Mode
The display window’s default is to display the ambient room temperature. The green indicator light under RT is on.
(RT = Room Temperature)
To set your desired temperature, press the Temperature up or down buttons (ranging from 62ºF to 90ºF). Each
press will increase or decrease your set temperature by 1ºF. When pressing the temperature up or down buttons,
the window will change to display your set temperature. At this time, the green indicator will light under ST (Set
Temperature). Once the temperature up or down buttons is released, the window will return to displaying the
ambient temperature after a second.
Note: When unit is in the following modes: Auto, Cool, or Heat - the compressor will cool/heat the room to
reach the set temperature. Once the ambient temperature has reached the set temperature, the compressor will
stop and unit will run in Fan mode. To conserve energy, the compressor will not start immediately after a couple
degrees increase or decrease, but will wait for a 5ºF allowance. For example:
In Cooling Mode with a set temperature of 70ºF
When compressor first stops after reaching 70ºF, unit will auto-switch to Fan.
Compressor will start cooling again when ambient temperature increases to 75ºF or above.
In Heating Mode with a set temperature of 72ºF
When compressor first stops after reaching 72ºF, unit will auto-switch to Fan.
Compressor will start heating again when ambient temperature drops to 67ºF or below.
In Auto Mode (with preset temperature of 68ºF for heat and 75ºF for cool)
Compressor will start cooling again when ambient temperature reaches above 80ºF or will start heating when
ambient temperature drops below 63ºF.
9. Timer operation indicator
10. Compressor Indicator
11. Temperature up selector
12. Temperature down selector
13. Fan speed selector
14. Mode (function)
option selector
15. Timer selector
16. ON/OFF (power) selector
17. Display window
1. Remove the filter frame from the unit by
pressing down on tabs and pulling forward.
2. Separate the filter from the filter frame.
3. Remove the active carbon filter
from its plastic bag.
4. Insert the active carbon filter
into the filter frame.
5. Fix the filter by reassembling
the fixer onto the filter frame.
6. Re-fit the filter frame
inside the unit.
7. It is recommended to
replace the carbon filter
every 3 to 6 months.
WARNING!
The length of the exhaust pipe is specially
designed according to the specification of
this product.
Do not replace or extend it with your own hose
as this could cause the unit to malfunction.
Operation
2 4
3 5


