


Installation
5
Operation
8
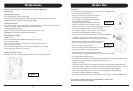
Setting The Fan Speed
Press the SPEED button to choose the fan speed you require, high or low. The indicator of high
or low fan will light up at the same time.
If the unit is in AUTO mode, it will select the fan speed automatically according to the
ambient temperature (the related indicators, cool, fan or heat will light up), at this time the
fan speed switch is invalid.
Setting the Timer
Press the TIMER button to set the operating hours you desire (1 to 12 hours, the timer
indicator will light up). When the set time has elapsed, the machine will turn off
automatically. The display window will show the hour(s) you set as you press the TIMER button.
If the timer button is not pressed, the unit will work continuously.
By pressing the timer button but without turning on the unit, you can PRE-SET the time for
the machine to work. For example, if you press the timer to ‘2’, the unit will come on
automatically after 2 hours.
All the above functions can also be performed with the supplied remote
control. This remote control requires 2 AAA batteries to operate.
Regulating the airflow direction
IMPORTANT!
• The compressor will start approximately 3 minutes after the unit is turned on (this will
help prolong the life of the compressor). After switching the unit off, please wait at least
3 minutes before turning the unit back on.
• The cooling system will switch off if the room temperature is lower than set. The fan, however, keeps
working at the set level. If the ambient temperature rises above the chosen temperature +/
-
5°F,
the cooling will resume.
• In heating mode, the compressor will switch off if the room temperature is HIGHER than the one set
(the fan keeps working at the set level). When the room temperature drops 5°F below the chosen
temperature, heating will resume.
• This machine is equipped with an ANTI-FROST function. Sometimes, while using the heating function
during low temperatures, the heating will stop for a while to melt the internal frost. When this occurs,
wait for heating to resume.
• As you switch on the heating, the fan will stop for 15-20 seconds prior to the unit starting.
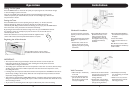
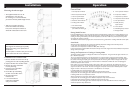
Wall Connection
1.Make a hole (5.1" in diameter)
in the wall.
2.Insert the Round Connector
(part #14) into the hole and
hold in place by using 4 small
screws (not supplied).
3.Extend one end of the exhaust
pipe (part #11) and screw into
the Round Connector by
turning clockwise.
4.Extend other end of exhaust
pipe and screw in Adaptor (part
#10) by turning clockwise.
5.Push Adaptor to fit firmly
over the opening on the back
of the unit.
** When not in use, cover the
Round Connector and hole
with Cap (part #15).
2. Attach Slide Bar Connector,
(Round Connector) to the
other end of the Hose by
extending hose at least 6".
Then tighten Hose by turing
the (Round Connector)
clockwise.
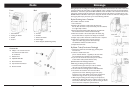
Window Kit Installation
In order for this unit to function
properly, it must be vented to the
outside.
Fitting the Exhaust Hose through
the window is easy. Please see
below.
1. Extend Hose at least 6" and
insert it into back of the unit,
tightening into place by turning
it clockwise.
3. Place Adjustable Slide Bar in
the wondow and expand so it
fits tightly.
4. Lower the windwo.
5. Make sure the Hose has no
kinks.
Slide Bar has 3 sections which
allows installation in windows up
to 48" in width.
Turn the roller on the air vent to control
the airflow direction from the vertical louvres.