


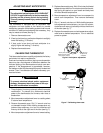
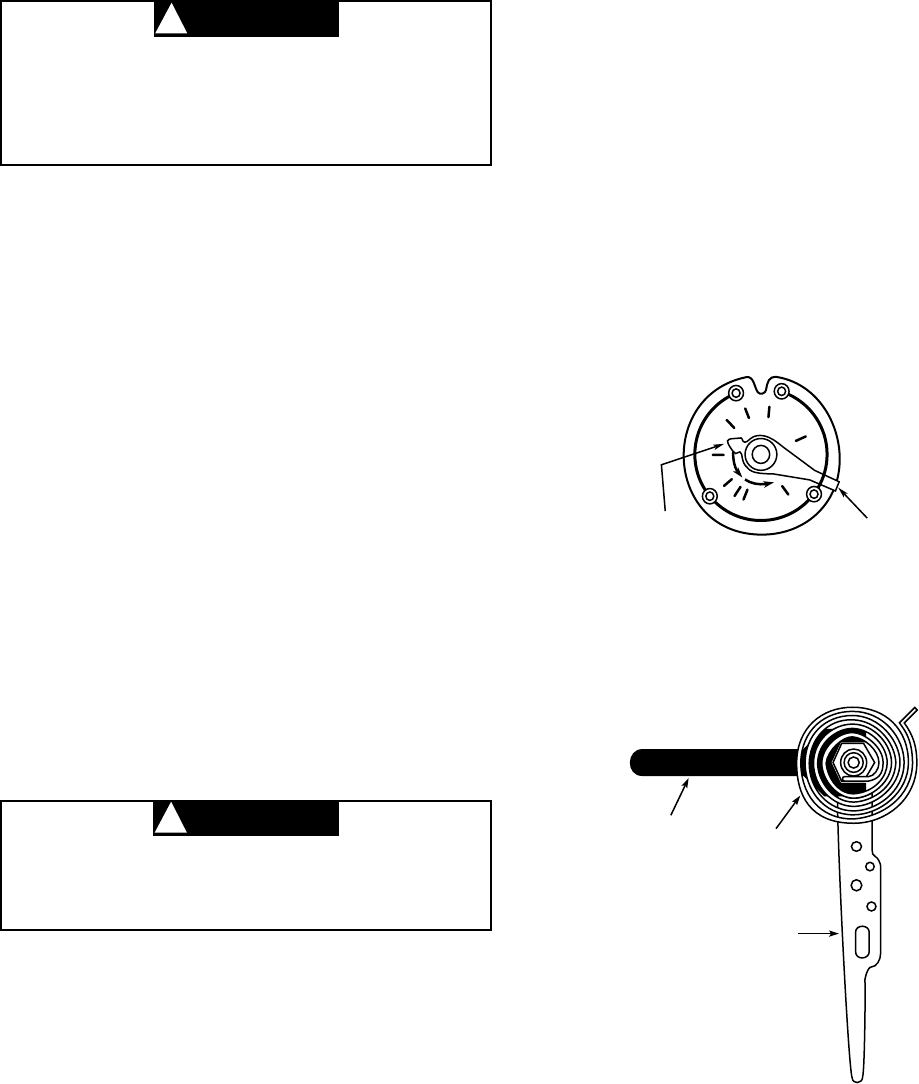
ADJUSTING HEAT ANTICIPATOR
The adjustable heat anticipator WILL BURN OUT
if 25 VAC is applied directly to the thermostat by
shorting out the primary control during testing.
This may cause personal injury and/or property
damage.
This thermostat is equipped with an adjustable heat
anticipator and was preset at the factory to provide
satisfactory operation of the heating system under normal
conditions. If additional adjustments are necessary, they
may be made as follows (see fig. 6):
1. Remove thermostat cover.
2. If heat cycle is too long, set heat anticipator to a slightly
lower dial setting (
1
⁄2 division).
3. If heat cycle is too short, set heat anticipator to a
slightly higher dial setting (
1
⁄2 division).
4. Replace thermostat cover.
CALIBRATING THERMOSTAT
This thermostat has been carefully adjusted at the factory
and should not require recalibration.
Due to environmental conditions, during normal operation
there may be a few degrees of difference between the
indicator setting of the thermostat and actual room tem-
perature. If the disagreement is appreciable, however,
first make sure that the thermostat is properly located and
leveled. Then, if recalibration still seems necessary, pro-
ceed as follows:
To prevent electrical shock and/or equipment
damage, disconnect electrical power to the sys-
tem until recalibration is complete.
1. The anticipator’s heat may adversely affect thermostat
recalibration. To prevent this, disconnect electrical
power to the thermostat at the furnace, main fuse, or
breaker box.
2. Move temperature adjustment lever to a setting about
5° above room temperature.
3. Remove thermostat cover. Slip
7
⁄32” wrench onto hex
nut beneath bimetal. While holding temperature ad-
justment lever stationary, turn hex nut clockwise until
mercury shifts to the right end of the tube (see fig. 7).
4. Move temperature adjustment lever to lowest setting.
5. Replace thermostat cover. Wait 10 minutes for bimetal
temperature to stabilize. Do not stand near the thermo-
stat during this period, as your breath and body heat
will affect bimetal temperature.
6. Move temperature adjustment lever to correspond to
actual room temperature. Then remove thermostat
cover.
7. Slip
7
⁄32” wrench onto hex nut. While holding tempera-
ture adjustment lever stationary, turn hex nut counter-
clockwise until mercury just barely shifts to the left end
of the tube (see fig. 7).
8. Replace thermostat cover and set temperature adjust-
ment lever to desired temperature. Turn on electrical
power to system.
CAUTION
!
CAUTION
!
.18
.25
.3
.4
.2
.15
1.
.8
.6
.5
Arrow points to the
matched current rating
of the primary control
Move this lever
to adjust heat
anticipator
Figure 6. Anticipator adjustment
L
O
N
G
E
R
C
Y
C
L
E
S
Bimetal
7
⁄
32
”
Calibration
wrench
Temperature
adjustment
lever
Figure 7. Calibrating thermostat