1
Introduction
Configuration
Troubleshooting
Programming
Features
FAQs
Index
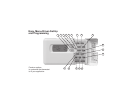
THE THERMOSTAT BUTTONS
See inside front cover for illustration
showing button locations.
1
(Blue arrow) Lowers temperature
setting (45
°F or 7°C minimum)
2
(Red arrow) Raises temperature
setting (99
°F or 37°C maximum)
3
The multi-color indicator glows:
green for 1st stage, yellow for 2
nd
stage,
flashing yellow for 3
rd
stage, red for
emergency heat and flashing red for
malfunction condition in system.
4
This button (on top of the cover)
lights the display.
5
Used to initiate or review
thermostat programming or advance to
next program period in programming
mode.
6
Used with TIME
FWD
/TIME
BACK
to set the clock.
7
Used to adjust the time backward,
or to select the previous menu item.
8
Used to adjust the time forward, or
to select the next menu item.
9
Used with TIME
FWD
/TIME
BACK
to set the current day.
10
Used to advance operation to the
next program period or advance to the
next day in programming mode.
11
Used to manually override
programming to hold at a selected
temperature.
12
Used to view ambient humidity or
modify humidity setting.
ORIENTATION
13
Selects fan operation (see The
Display page
3). This button is also
used to program the fan to run
continuously during a program period.
14
Used to enter the service menu to
change or reset humidifier, air filter,
UV bulb, and service timers.
15
Sets the system mode (HEATing,
EMERgency (Heat Pump models
only), OFF, COOLing, or
AUTOmatic changeover).
16
Used to adjust the clock one hour
forward or back.
17
Used to start or return to program
operation.


