


3
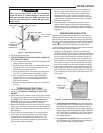
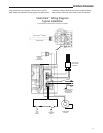
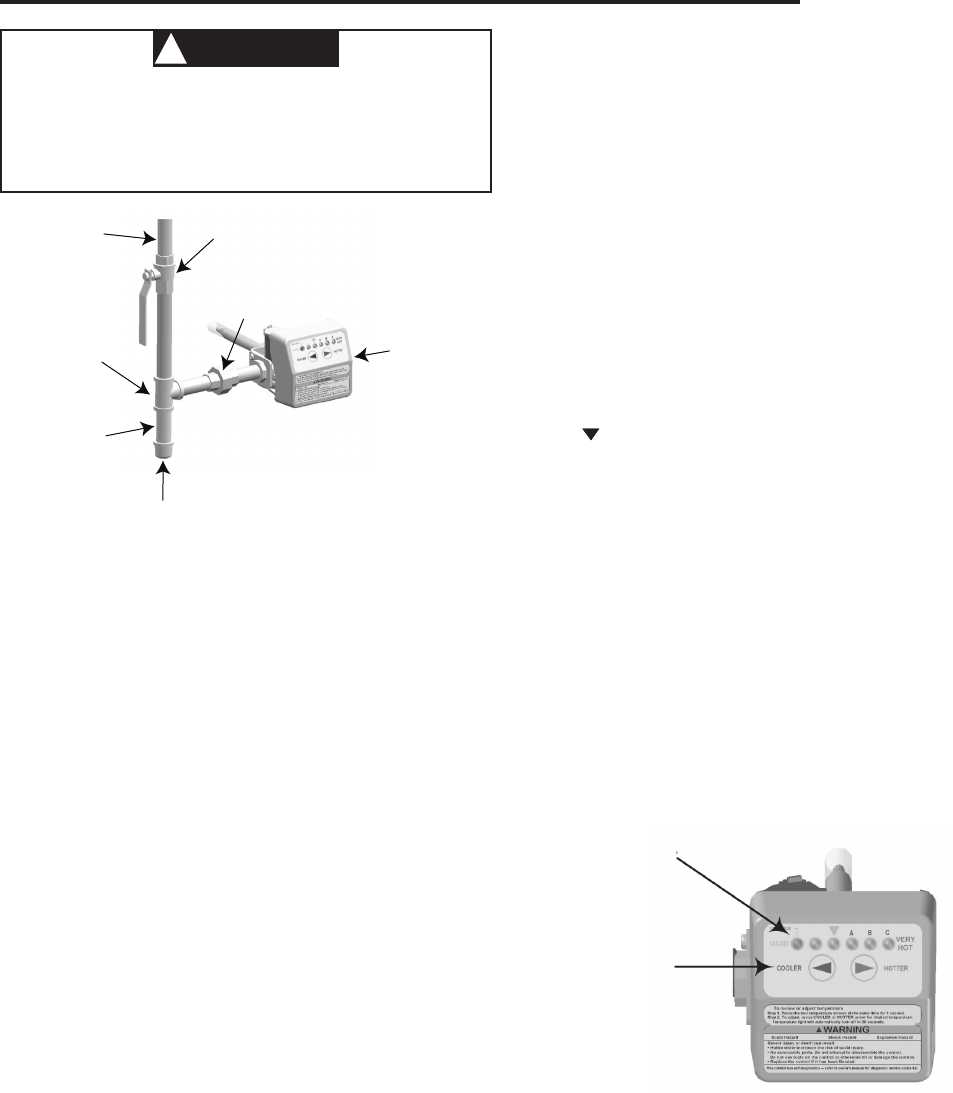
GROUND JOINT UNION
INTELLI-VENT™
CONTROL
GAS SUPPLY
PIPE
TEE
DRIP LEG
(SEDIMET TRAP)
3" MINIMUM
(MANDATORY)
PIPE CAP
SHUT-OFF VALVE
8. Open the gas shutoff valve.
9. BEFORE TURNING ON THE APPLIANCE, CHECK THE
GAS LINES FOR LEAKS.
a. Use a soapy water solution. DO NOT test for gas leaks
using a match or open flame.
b. Brush the soapy water solution on all gas pipes, joints,
and fittings. Use care that excess solution does not
enter the control’s plastic housing.
c. Check for bubbling soap. This means you have a leak.
Turn OFF the gas and make the necessary repairs.
d. Turn on the gas and recheck for leaks. Repeat this
process until you are sure the system is gas-tight. If
repeated work on a part does not stop the leak, the
part must be replaced.
e. Rinse off the soapy solution and wipe all the plumbing
parts dry.
OPERATING INSTRUCTIONS
1. The control uses an automatic ignition system to light
the burner. DO NOT TRY TO MANUALLY LIGHT THE
BURNER.
2. Wait at least five (5) minutes to clear out any gas, and then
smell around the appliance area near the floor. If you smell
gas, STOP! Follow the instructions “What to do if you
smell gas” on the first page of this instructions sheet. If
you do not detect gas, continue with the next step.
3. Make sure that both the inner and outer doors are in place.
These doors are located where the burner tube enters the
water heater at the bottom. Both doors must be in place for
safe operation.
4. Turn on power to the water heater. This can done either
by turning on the disconnect switch to the water heater,
or plugging in the water heater to a nearby outlet. The
installer should have made this provision for you, and
it must meet local and state ordinances of the National
Electric Code, whichever applies.
INSTALLATION
CAUTION
!
Never use this water heater unless it is completely
filled with water. To prevent damage to the tank, the
tankmustbe lledwithwater.Watermustowfrom
the hot water faucet before turning ON gas to the
water heater.
Figure 1. Typical gas connection
5. For a brief (one to five seconds) all of the indicators on
the front of the control should come on, and then turn
off. This indicates that the control has completed the
self-diagnostic test, and is ready for operation. If any
combination of indicators remain illuminated, either refer
to the troubleshooting section of this manual, or contact a
qualified service person.
6. The water heater is now ready for operation, and will
begin to heat the water to the factory default setting of
approximately 70
o
F. If an alternate temperature setting is
required, please refer to the following section “Temperature
Regulation.”
TEMPERATURE REGULATION
After the gas and electrical connections are made and the
water heater tank is full of water, the control will now start to
heat the water to the factory default setting of approximately
70°F. If a higher setting is desired, start with the setting at the
triangle( ). This is approximately the 120°F setting, and the
safest and most economical setting for the water heater.
To change the temperature setting for either cooler or warmer
water, the following steps are necessary:
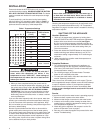
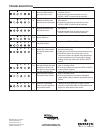
1. “Wake up” the temperature indicators by pressing the
COOLER and HOTTER temperature adjustment buttons at
the same time and releasing after one second (see Figure
2). One or two of the temperature indicators will light up.
These indicators will only remain on for 30 seconds if no
further buttons are pressed. After 30 seconds the control
will go back to “Sleep” mode, and both buttons will again
have to be pressed to see the water temperature setting.
2. If this is the first time that the control has been used, the
leftmost green indicator will be illuminated indicating the
water temperature setting of approximately 70°F. See Table
1 for an explanation of what each of the temperature indi-
cators mean.
TEMPERATURE
INDICATORS
TEMPERATURE
ADJUSTMENT
BUTTONS
Figure 2. Temperature Indicators and Adjustment
a. To decrease the temperature press and release the
COOLER button once. The temperature indicators will
now display the new temperature setting. Press and
release the COOLER button until you have reached the
desired setting. HOLDING DOWN THE BUTTON WILL
NOT CONTINUE TO LOWER THE SETTING. The But-
ton must be pressed and released for each tempera-
ture change desired.
b. To increase the temperature press and release the
HOTTER button once. The temperature indicators will
now display the new temperature setting.