


8
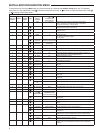
12. Select Continuous Backlight – In low lighting condi-
tions, display backlight improves the display contrast.
When C terminal is connected, selecting dL On will turn
the backlight on continuously. Selecting dL Off will turn
the backlight on momentarily after any key is pressed.
When C terminal is not powered (battery only), dL On
enables the momentary backlight whenever a key is
pressed.
13. Select Backlight Intensity – This thermostat has the
ability to provide two selectable intensities of the back-
light: HI and LO. You can toggle the selection between HI
and LO.
14. Select Temperature Display Adjustment 5 LO to 5 HI
This allows you to adjust the room temperature display
by -5°F to +5°F in 1° steps. Your thermostat was accu-
rately calibrated at the factory, however you have the
option to change the display temperature value to match
the previous thermostat, if you so prefer.
15. Select °F or °C Readout – Changes the display readout
to Celsius or Fahrenheit as required.
16. Select Audio Prompting (Beeper) On or Off – Factory
default setting is b, On. If you wish to turn off the beeper
select OFF.
17. Select Daylight Saving Time Calculation – This feature
will allow the thermostat to calculate the DST automati-
cally and apply it to the Real Time Clock display. Default
is On.
18 & 19. Select Automatic Schedule – This feature allows
programming a “Comfort Temperature” into all program
periods with the Auto Schedule key. When Heat AS
(for Heat mode) or Cool AS (for Cool mode) is selected
On, the Auto Schedule feature is ready to be set. Off
indicates that the feature is not ready to be used or a
“Comfort Temperature" is already set. See Auto Schedule
in Programming section.
20. Select Cool Savings™: Cool Savings allows you to
select a temperature offset (from 1-6 degrees). When
the compressor runs for long periods, the thermostat will
internally slowly/gradually adjust the room temperature
display lower, subtracting a maximum of the number of
degrees you select.
This energy saving feature is based on the principal that
long compressor run times lower indoor humidity and
make a slightly higher temperature feel comfortable.
Cool Savings operates only when the compressor runs
20 minutes or longer, normally on the hottest summer
days. When Cool Savings is operating the thermostat will
fl ash "Cool Savings" to indicate it is slowly adjusting the
display temperature lower.
21. Compressor Optimization – (Not available on earlier
models) CO provides a delay in circulator fan operation
after the compressor turns on or off. With CO selected
ON, when the compressor turns on (for a call for heat
in heat pump or a call for cool) the fan will be delayed
for fi ve seconds before turning on to allow the air to be
heated or cooled. After the compressor turns off for call
for cool, the fan will continue to run for 20 seconds to
capture additional cooling from the system. If CO is set to
OFF, there will be no delay in fan operation.
22. Heat Temperature Limit Range – This feature adjusts
the highest setpoint temperature for heat. The default set-
ting is 99°F. It can be changed to a setting between 62°F
and 98°F. The "temperature limit" icon will be displayed
to the left of your setpoint temperature when using this
feature. The "temperature limit" icon will fl ash if an
attempt is made to adjust the temperature beyond the
range selected.
23. Cool Temperature Limit Range – This feature adjusts
the lowest setpoint temperature for cool. The default
setting is 45°F. It can be changed to a setting between
46°F and 82°F. The "temperature limit" icon will be dis-
played to the left of your setpoint temperature when using
this feature. The "temperature limit" icon will fl ash if an
attempt is made to adjust the temperature beyond the
range selected.
24. Keypad Lockout – This step allows you to select the
type of lockout or limited range security required. If no
lockout or limited range security is required, press
to
advance the menu.
Three security settings are available in this menu item.
Use the
or keys to select the lockout desired.
Lockout selections are:
"Keypad Lockout and L" = Total Lockout. Total Lockout
locks all keys.
"Keypad Lockout and P" = Partial Lockout. Partial Lock-
out allows only the
or keys to operate within your
set temperature limits.
"Temperature Limit/Keypad Lockout" prevents chang-
ing the temperature limits in the Confi guration Menu.
After the type of lockout is selected, press
.
Keypad Lockout Combination Number Selection
Display will read "000" "Keypad Lockout".
Skip this step and continue through the remainder of the
confi guration menu if you require an Air Filter Change
out indicator or Humidifi er Pad Change out indicator by
pressing the
key to advance.
Return to this point when you are ready to start your
selected lock-out and continue by:
Pressing
or keys to select your keypad lockout
combination number. Note: "000" is not a valid combina-
tion choice.
Record the number you select for future use.
Press
to exit the menu. The security feature you select
will start in 10 seconds. The system key will remain active
for 10 seconds to allow setting Heat, Off, Cool or Auto.
To unlock the keypad, press Menu, then press Installer
Confi g. Display will show "000" and keypad lock. Enter
the code used to lock the keypad and press
.
25 & 26. Select Fast Second Stage, ON or OFF – Selecting
FA ON forces additional heat stages to come on quickly
when
is used to raise the temperature a few degrees
above the room. Select this setting if you want the heat to
increase quickly when you manually raise the temperature.
Selecting FA OFF allows the thermostat to calculate an
optimal time to bring on additional stages of heat. When
the
is used to raise the setting above the room tem-
perature additional heat stages may come on very quickly
or very slowly (up to 30 minutes later) depending on
recent system performance. Select this setting if you do
not require the additional heat stages to come on quickly
INSTALLER/CONFIGURATION MENU