


5
OPERATION
Before you begin programming your thermostat, you should be
familiar with its features and with the display and the location and
operation of the thermostat buttons. Your thermostat consists of
two parts: the thermostat cover and the base. To remove the
cover, gently pull it straight out from the base. To replace the
cover, line up the cover with the base and press gently until the
cover snaps onto the base.
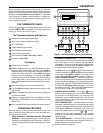
THE THERMOSTAT BASE
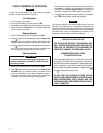
Other than and , the following buttons and switches are
located behind the door on the bottom of the thermostat cover
(see fig. 6). Pull the door down to open it.
The Thermostat Buttons and Switches
1
(Red arrow) Raises temperature setting.
2
(Blue arrow) Lowers temperature setting.
3
SET TIME button.
4
VIEW PRGM (program) button.
5
RUN PRGM (program) button.
6
HOLD TEMPerature button.
7
SYSTEM button (COOL, OFF, HEAT, AUTO).
8
FAN switch (ON, AUTO).
The Display
9
Indicates day of the week.
10
HEAT is displayed when the SYSTEM button has been
pressed to put the thermostat in the HEAT mode. COOL is
displayed when the SYSTEM button has been pressed to
put the thermostat in the COOL mode. COOL is displayed
(flashing) when the compressor is in lockout mode. AUTO
is displayed when the SYSTEM button has been pressed to
put the thermostat in the automatic changeover (AUTO)
mode. 1+2 indicates the number of stages the thermostat is
calling for.
11
Alternately displays current time and temperature.
12
The word HOLD is displayed when the thermostat is in the
HOLD mode.
13
BATT is displayed when approximately 70% of battery life
has been exhausted.
14
Displays currently programmed set temperature (this is
blank when SYSTEM button has been pressed to turn the
system OFF).
15
LK is displayed when keypad lockout has been activated.
OPERATING FEATURES
Now that you are familiar with the thermostat buttons and
display, read the following information to learn about the many
features of the thermostat.
• SIMULTANEOUS HEATING/COOLING PROGRAM
STORAGE — When programming, you can enter both your
heating and cooling programs at the same time. There is no
need to reprogram the thermostat at the beginning of each
season.
Figure 6. Thermostat display, buttons, and switches
3
2
1
4 5 6 7 8
SU
HOLD AUTO
SA
P
MO TU WE TH FR
LK
9 91110
101012
BATT
131415
11
COOL-OFF-HEAT-AUTO
AUTO
SET TIME VIEW PRGM RUN PRGM HOLD TEMP FAN ONSYSTEM
COOL 1+2
HEAT 1+2
• AUTOMATIC CHANGEOVER —If you have a heating/
cooling system, you can set the thermostat to automatically
switch from heat to cool as needed to maintain setpoint
temperature. To select this mode, press SYSTEM button
until AUTO is displayed along with HEAT or COOL, iden-
tifying the program automatically selected.
In AUTO mode, pressing and at the same time will
change the displayed setpoint temperature to the setpoint
of the other mode (HEAT or COOL). This allows you to
change both the HEAT and COOL setpoints, if desired.
• TOTAL KEYPAD LOCKOUT — This security feature al-
lows you to lock out the thermostat buttons and switches to
prevent unauthorized tampering. To select this feature after
programming, press SET TIME and RUN PRGM buttons at
the same time and hold until LK is displayed. To unlock the
thermostat, press SET TIME and RUN PRGM buttons at
the same time until LK is no longer displayed.
• TEMPERATURE OVERRIDE — Press or until the
display shows the temperature you want. The thermostat
will override current programming and keep the room
temperature at the selected temperature until the next
program period begins. Then the thermostat will automati-
cally revert to the program.
• HOLD TEMPERATURE — The thermostat can hold any
temperature within its range for an indefinite period, without
reverting to the programmed temperature. Press the HOLD
TEMP button. HOLD will be displayed. Then choose the
desired hold temperature by pressing or . The ther-
mostat will hold the room temperature at the selected
setting until you press RUN PRGM button to start program
operation again.
• °F/°C CONVERTIBILITY — Press SET TIME and HOLD
TEMP buttons until the temperature display is in Celsius. To
display Fahrenheit, repeat the process.
(Instructions continue on page 6.)