


6
Bobbin Winding and Insertion
Winding the bobbin
You can wind your own bobbins
with thread from spools you
purchase separately to have a
virtually unlimited thread color
selection. Match your fabrics
or contrast with the thread
shades of your choice.
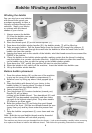
1. Always remove the bobbin
(S) from the bobbin case on
the machine before you
wind a new bobbin.
2. Place the thread spool (E) on the thread spindle (C).
3. Press down the bobbin winder handler (W), the bobbin winder (T) will be lifted up.
4. Take an empty bobbin. Pull the thread down from the thread (E) through the clamper (I)
and thread the loose end through the small hole the bobbin to allow the small hole on the
bobbin rim from the outside.
5. Leaving the loose end on the outside of the bobbin, wind the thread several turns around the
INSIDE of the bobbin.
6. Place the bobbin on the bobbin winder spindle; making certain that the thread is winding
onto the bobbin in a counter-clockwise direction. Adjust the bobbin to allow the small hole
on the bobbin rim to line up with the spring on the bobbin winder spindle.
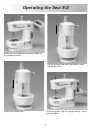
7. Press down the “ON” switch, the machine will start to wind the bobbin.
8. When the bobbin is full, switch off the machine. Insert the bobbin into bobbin case.
9. Lift up the bobbin winder handler.
Bottom bobbin placement
1. Press the release button (H) on the rear of the machine
to pop up the cover of the bobbin compartment (I).
2. Remove cover by lifting up where it has popped up at
rear.
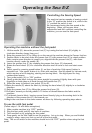
3. Place the bobbin with thread of your choice in the
bobbin holder (J) leaving about 5 inches of thread
extended out from the bobbin holder (J).
4. Lower presser foot (F).
5. Turn hand wheel (K) counter-clockwise (toward you).
Needle (R) will go down,
picking up the bobbin thread. Turn handwheel (K) until
needle (R) has descended completely and then come
up again to its highest raised point. Stop when needle
(R) starts to go down again.
6. Raise the presser foot (F) and bring the spool thread
around to the front. Pull the two threads toward the rear
(away from you) and lay them under the presser foot
(F).
7. Snap the bobbin compartment (I) cover down and into
place.
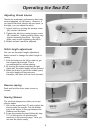
Note: Both the top and bobbin thread must be threaded
cor
r
ectly or the machine will not stitch pr
operly
.
The machine may have come pre-threaded from the factory. Look at this threading carefully before removing
it to replace the thread or bobbin with different thread. Then follow the preceding instructions to rethread.