


7
Metal or Wood Casement Window Installation
■ Handle air conditioner with care.
■ Be sure your air conditioner does not fall out of the opening
during installation or removal.
■ Do not block the louvers on the front panel.
■ Do not block air movement on the outside of the air
conditioner.
■ The window frame assembly and side of structure must be
adequate to support weight of air conditioner.
Metal Casement Window Installation
This air conditioner is designed to fit into most casement-type
windows. As shipped from factory, air conditioner will fit into a
minimum window opening 15¹⁄₂" (39.4 cm) wide and 22" (55.9
cm) high. The preferred method of installation is through a closed
or stationary window. Installation in an open window frame is also
possible where open window can be secured to outside of
building or removed completely.
Closed or stationary window
Install air conditioner in stationary sash to avoid crank handles or
window latches. If air conditioner is to be installed in or next to a
movable sash, it may be necessary to remove catch, handle or
both.
■ Remove crank handle and secure window in closed position.
Remove glass panes and separating strips to a height
sufficient to mount air conditioner.
Open window frame
1. Remove crank mechanism and catch handles.
2. Fold window sash back against exterior wall of building and
secure, or remove completely where possible.
Wood Casement Window Installation
1. Construct a frame, using at least 1" (2.5 cm) thick wood panel
with a 15¹⁄₂" (39.4 cm) wide opening.
2. Paint frame and fasten it securely, sealing it into window
opening.
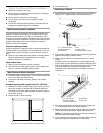
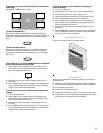
If window opening width is greater than 15¹⁄₂" (39.4 cm):
1. Measure from side of window opening 15¹⁄₂" (39.4 cm). From
this point, measure to opposite side of window opening to
find width of filler panel. Measure height of window. Cut a ³⁄₄"
(19 mm) thick wood filler panel this width and the full height of
the window opening.
2. Attach securely to side of opening.
3. Paint desired color.
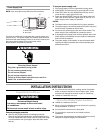
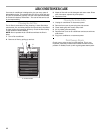
Install Support Platform
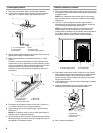
1. Loosely attach support angle to bottom of support platform
using two ⁷⁄₁₆" machine screws, flat washers and nuts.
2. Place support platform against lower window track and firmly
against vertical edge of window frame.
3. Attach support platform to windowsill using two 1" wood
screws.
If required, overcome interference of support platform with
window track or storm windows by securely attaching a shim
strip to the windowsill. Shim strip should be as long as width
of support platform and flush with back edge of sill.
Thickness of shim strip should be controlled by amount of
interference.
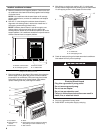
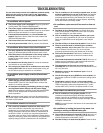
4. Pull support angle against outside of structure. Tighten two
⁷⁄₁₆" machine screws on top of support platform.
5. Adjust leveling bolt to position support angle in a level plane.
This will allow for proper angle. Tighten leveling bolt nut.
NOTE: Air conditioner must be level or tilted back slightly to
facilitate proper condensate disposal.
6. Cut two pieces of seal to height of window opening. Remove
backing and apply to window frame on both sides.
15
¹⁄₂
" (39.4 cm) from side of window to wood filler panel
15
1
/
2
" (39.4 cm)
A.
⁷⁄₁₆
" machine screws
B.Support platform
C.Flat washer
D.Nut
E.Support angle
F. Leveling bolt and locknut
A.1" wood screws
B.Support platform
C.Lower window track
D.Windowsill
E.Shim strip
B
C
D
A
E
F
A
B
C
D
E