


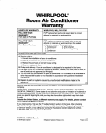
4. Remove side curtains. Slide curtains out
to their fullest width. From the back side,
remove the Phillips-head screws
(A)
holding the curtains to the cabinet.
5. Remove the slotted hex-head screws
(0) holding the top channel.
6. Remove the slotted hex-head screws
(C) on the sides of the cabinet.
7. Holding both sides of the cabinet, care-
fully lift the cabinet off the base.
8. Wrap the motor, electrical control box,
and the compressor terminal box in
plastic film to make sure no water or
other liquid gets inside. Water or other
liquids could damage the insulation and
cause serious mechanical problems.
9. Clean and hose out the base, coils, and
condensate pans. Clean at least once a
year, or more often if the condenser
coils and pans collect dirt, sand, leaves,
insects, or algae. Also, clean if you detect
an odor coming from the air conditioner.
10. Remove plastic film from motor and
electrical parts.
11. Replace the air conditioner in the cabinet.
Reattach top channel and side curtains.
Tighten all screws.
12. Reinstall the air conditioner in
the window.
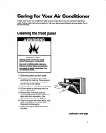
13. Replace the front panel.
14. Plug in the power cord.
NOTE:
It is a good idea to wait 24 hours
before starting the unit again. This allows
time for all areas to dry thoroughly. The
water from rainfall or from normal opera-
tion does not harm the components.
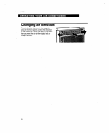
Saving energy
l
Improve your home’s insulation. Seal all
doors and windows. Close the
fireplace flue.
l
Close blinds or drapes on the sunny side
of the house. Add window awnings.
l
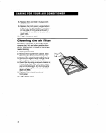
Keep the air filter clean.
l
Do not block the airflow from the air
conditioner with drapes or furniture.
l
Ventilate the attic. High temperatures in
the attic add to the cooling load.
10
l
Try not to use heat-producing appliances
during the hottest part of the day.
l
Turn lights and appliances off when
not needed.
l
Keep heat registers and cool-air
returns closed.
l
Use exhaust venting fans while cooking,
doing laundry, or bathing.