


6
1. Measure the existing wall sleeve.
2. See the section that matches the dimensions of the existing
wall sleeve.
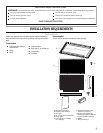
Wall sleeve dimensions (W x H x D):
25¹⁄₂" x 15¹⁄₄" x 17¹⁄₂" (64.8 cm x 38.7 cm x 44.5 cm),
25³⁄₄" x 16⁷⁄₈" x 18⁵⁄₈" (65.4 cm x 42.9 cm x 47.3 cm),
25⁷⁄₈" x 16¹⁄₂" x 17¹⁄₂" (65.7 cm x 41.9 cm x 44.5 cm) or
26" x 15⁵⁄₈" x 16⁷⁄₈" (66 cm x 39.7 cm x 42.9 cm)
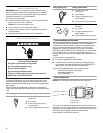
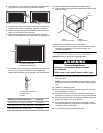
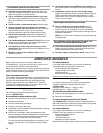
1. Remove the existing grille from the wall sleeve.
2. Remove all debris from inside the wall sleeve.
3. Insert new grille into wall sleeve.
NOTE: Make sure that the word “Top” is readable from inside
the room.
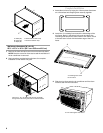
4. Using the grille as a template, mark locations of 2 holes on
each side of the wall sleeve. Drill ¹⁄₈" holes into the wall
sleeve.
5. Attach the rear grille using #8 - 32 sheet metal screws
(provided).
Wall sleeve dimensions:
26³⁄₄" x 15³⁄₄" x 15" (68 cm x 40 cm x 38.1 cm),
27" x 16³⁄₄" x 16³⁄₄" (68.6 cm x 42.6 cm x 42.6 cm), or
27" x 16³⁄₄" x 19³⁄₄" (68.6 cm x 42.6 cm x 50.2 cm)
These sleeves require a larger rear grille and installation parts
than the ones provided with this air conditioner. See your local
supplier for a kit to fit this size wall sleeve.
NOTE: If you install your new air condtioner into this size wall
sleeve without using the kit, you will cause damage to your new
air conditioner and the warranty will be void.
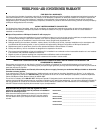
Plastic Grille Installation
1. Cut the plastic grille 26¹⁄₂" (67.3 cm) wide and 15¹⁄₂" (39.4 cm)
high.
2. Place the plastic grille inside the wall sleeve at the rear flange.
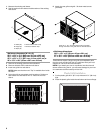
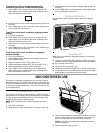
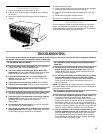
A.Width (W)
B.Height (H)
C.Depth (D)
D.Horizontal insulation strip
E.Vertical insulation strip
A.Drill
¹⁄₈
" holes into the wall sleeve.
A
B
C
D
E
A
A
Insert the 4 - #8 - 32 sheet metal screws (provided)
through the holes in the grille and into the wall sleeve.