


9
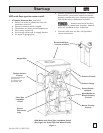
Cleaning boiler flueways:
Make sure all electrical connec-
tions to boiler are turned off and wait until boiler
is warm, not hot, before cleaning. Failure to do so
will result in severe personal injury, death or
substantial property damage.
1. Top flue boilers -remove breeching and jacket
top panel.
Rear flue boilers - remove jacket top panel.
2. Remove flue collector hood, saving hardware
for reassembly.
3. Shut off oil valves. Arrange drip pans under
the areas of oil piping that will be discon-
nected. Disconnect oil line at burner so
that you can swing open the door complete-
ly.
4. Line combustion chamber floor with news-
paper to catch any soot that will be loosened
in the cleaning process.
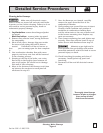
5. Starting at the top of the boiler, use a wire
flue brush to thoroughly clean between all
pins at all angles. Be careful not to damage
side wall of rear refractory.
6. Move to the bottom of the flueways and clean
up between the sections to reach pins left
uncleaned in step #5.
Thoroughly clean flueways
between all pins at all angles.
Start on top of boiler,
finish from the bottom.
Cleaning Boiler Flueways
Figure 3
Detailed Service Procedures
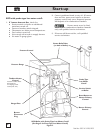
7. Once the flueways are cleaned, carefully
remove the paper from the floor of the
combustion chamber.
8. Verify sealing rope around flue area is intact.
Visually check condition and position of
insulation in combustion chamber floor,
and the refractories at the rear of boiler and
in the burner mounting door. Replace any
parts as necessary.
9. Close burner mounting door and tighten nut
securely. Place flue collector hood on top of
boiler. Secure with hardware from step #2.
Maintain a gas-tight seal to
avoid possible flue gas leakage and carbon
monoxide emissions, which can lead to severe
personal injury or death.
10. Check breeching for sooting and clean if
necessary. Install jacket top panel and
breeching.
11. Reconnect oil line and all electrical connec-
tions.
Part No. 550-141-830/1202