


Please Do Not Return This Product To The Store. Call Us Directly! Our Trained Technicians Will Answer Your Questions and/or Ship Any Parts You May Need
You can reach us Toll Free at 1-888-827-3667 for Consumer Assistance or online at www.wayne-dalton.com
5
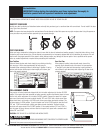
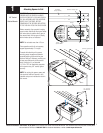
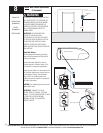
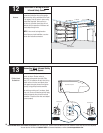
Mounting Door Bracket
Tools Needed:
7/16” Socket
Ratchet Wrench
NOTE: If you have a 5120, 5140, 9100,
9400, 9600, 9700 or 9800 series door,
do not install this door bracket, install the
door bracket supplied with the door, see the
Installation Instructions and Owner’s Manual
supplied with the door. Instructions manuals
are available for download at www.wayne-
dalton.com or call 1-888-827-3667.
IMPORTANT: DOORS MAY NEED TO BE
REINFORCED TO PREVENT DAMAGE TO THE
DOOR. CHECK WITH THE GARAGE DOOR
MANUFACTURER FOR PROPER
REINFORCING OF YOUR DOOR.
For wood doors, mount door bracket,
using two 1/4”-20 x 2” carriage bolts and
1/4” locking nuts supplied, on center line of
door with middle hole in line with top rollers.
For metal doors, mount door bracket,
using two 1/4”-20 x 5/8” self drilling screws
supplied, on center line of door with middle
hole in line with top rollers.
Door Center
Line
Door
Bracket
Top Roller
Guideline
Door Center
Line
Door
Bracket
Top Roller
Guideline
Top Roller
Guideline
Reinforce Door Vertically and
Horizontally
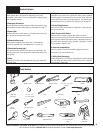
7
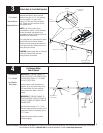
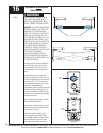
Installing Light
Tools Needed:
None
Remove lens by pressing up on both sides
of the bottom of the lens at the junction of
the housing, releasing the locking tabs, and
pulling forward.
Screw a 60 watt (Maximum) bulb into
socket. For maximum bulb life, “rough
service” bulbs are recommended.
Align the top and bottom tabs on the lens
with the housing and push straight on until
lens locks in place.
Socket
Locking Tabs
Bulb - 60 Watt
Maximum
(Not Supplied)
Lens
Housing
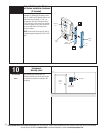
6
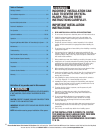
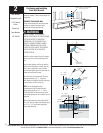
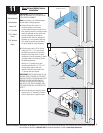
STEEL
DOORS
WOOD
DOORS
1/4”-20 x 1/2”
Self Drilling Screws
1/4”-20 x 2”
Carriage Bolts
1/4”
Locking Nuts
PRE-OPERATION