


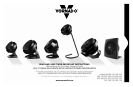
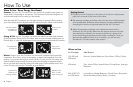
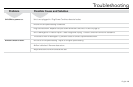


10 English
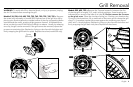
Model 360 • The grill on your model will be able to be removed in one of two
ways. Check the back of your unit to see how many screws your unit has and
follow the appropriate instructions.
Instruction A • Feel for bumps on back of product, close to inlets, that help to
locate screws at roughly 12, 3, 6 and 9 o'clock positions. Remove the 4 screws
located at these positions, releasing the grill. To reattach – position grill so the
logo in the center of the grill is straight and replace screws.
Instruction B • Remove the 2 screws located in between the ribs of the inlet
grill at roughly 9 and 3 o’clock positions, releasing the grill. To reattach – po-
sition grill so the logo in the center of the grill is straight and replace the 2
screws.
²
²
²
²
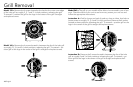
Grill Removal
Model 133 • Remove the 4 screws located at the back at the outer most edge
of the inlet grill at roughly 2, 5, 7 and 11 o'clock positions, releasing the grill.
To reattach - position the grill so the logo in the center of the grill is straight
and replace screws.
Model 160 • Remove the 4 screws located in between the ribs of the inlet grill
at roughly 12, 3, 6 and 9 o’clock positions, releasing the grill. To reattach – po-
sition grill so the logo in the center of the grill is straight and replace screws.
²
²
²
²
²
²
²
²
²
²
²